
Tongue and groove ceilings – they’re beautiful, but like many beautiful things, they can be problematic.
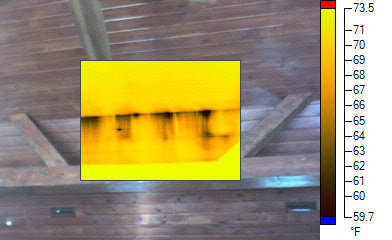
(Photo shows a thermal scan of a ceiling where cold air is leaking in through the gaps – those are the black streaks down the photo)
Unfortunately, T&G ceilings have become the single most discussed items on Ted’s Energy Tips due to their overwhelming tendency to be associated with water, mold, or moisture problems.
Does your ceiling drip water?
I’ve probably heard this a hundred times – “Help! Water is leaking from my ceiling! We had a cold snap and now it’s a beautiful day and now it’s raining in my house!”
The caller/writer then tells me that the roofer came out to check for leaks and couldn’t find anything. If they took it a step further, someone pulled off some of the ceiling planks, saw the real problem (condensation) and told them that they need to ventilate the ceilings. If they’re unlucky, they spent thousands of dollars, added ventilation, and the water problems became worse!
Why do ceilings drip when there’s no leak?
Boil a pot of water with a lid on it. Wait a minute then lift the lid. What do you see? Lots of water on the underside of the lid. There’s no ‘leak’ but yet the lid is covered with water due to condensation forming on it. This is exactly what’s happening inside your ceiling.
Under the right conditions, when water vapor in the air comes in contact with a surface cooler than the air, the water vapor becomes liquid water. If this happens enough, the water builds up and forms large drop of water. Those get large enough and, PLOP!, it starts raining in your house!
All too often, a T&G ceiling is constructed in a way that virtually guarantees water problems. The roof is installed over the rafters. Fiberglass is shoved between the rafters. T&G boards are nailed to the rafters. Bingo – you get mold, water “leaks”, and thousands of dollars of repairs which probably don’t even fix the problem.
Why don’t normal ceilings drip?
A typical ceiling is made of sheetrock or plaster, and all the seams are carefully filled in. That’s then painted, usually with several coats of paint.
While some tiny amount of water vapor can get through the paint and sheetrock, it’s a very small quantity. Small enough that, under normal conditions, natural air flow and moisture transfer removes the moisture that does get into the ceiling cavity above the sheetrock.
However, even these ceilings often have problems when holes are cut in them for recessed lights. This allows that air and moisture to move much more quickly into the ceiling where it can condense and lead to mold growth and wood rot.
The key fact – if air gets into your ceiling, even through small holes, it will carry water vapor with it which is very likely to lead to moisture problems.
Why are T&G ceilings so bad?
Water vapor is tiny. Really, really tiny. So tiny, that even the smallest crack is billions and billions of times larger than the water molecule. Tongue and groove ceilings may look ‘tight’ but to a water molecule, it’s like a wide open door! So that water vapor simply flows right up through those cracks and into the ceiling cavity above.
To Make matters worse, most ceilings are stuffed with fiberglass insulation, which doesn’t stop the water vapor at all. So the vapor keeps wafting up past the insulation until it reaches the underside of your roof. That roof deck is cold in the winter and on clear nights. When the vapor hits it, it condenses into liquid water. This is when the real problems start…
When it’s below freezing, the water freezes into ice. More water vapor enters, contacts the ice, and adds to the ice. Before you know it, the entire underside of the roof and anything else cold enough in the ceiling cavity, is covered with a layer of ice. This could go on for days, weeks or even months until the ice melts and it starts raining in your living room!
Even when it’s not below freezing, in most climates, it gets cold enough and there’s enough water vapor carried by the air for condensation to form inside the ceiling. The wood can absorb some of that moisture and slowly transfer it out. But with a T&G ceiling, the water supply inside the house is nearly infinite, so it keeps building up. Pretty soon, the wood is saturated and larger water droplets form. They’ll drip down, following gravity, until they find a place to leak out. That’s why the drips often form far away from where the condensation is actually occurring, which is often high up the ceiling.
Will ventilation solve the problem?
Builders are taught that roofs have to be ventilated in order to ‘flush out’ the moisture. The problem is, that doesn’t work with T&G ceilings. In fact, it often makes problems worse.
Why? As the air moves through the cavity, it has a tendency to draw more air from the inside of the house into the cavity. Some of that is flushed out with the air moving through the cavity. But when the water vapor carried by the air comes in contact with cold surfaces, it basically sticks. If there’s enough, which there usually is in a house during winter, then you still have the condensation problem.
How do you prevent water vapor from getting in the ceiling?
Take a step back. What ceilings work properly? We started discussing how a typical drywall ceiling usually doesn’t have moisture problems like these (unless you put holes in it). So the easiest solution is to build a normal drywall ceiling over which you install the T&G boards – purely for aesthetic purposes. Drywall is cheap. Replacing your roof is expensive.
What about plastic sheeting?
Drywall is cheap. Replacing your roof is expensive.
Some builders try to ‘cheap out’ by just putting plastic up, usually with thousands of staples, then nailing the T&G boards to the rafters, with thousands more nails.
Do you think a sheet of plastic with thousands of holes in it is going to stop the movement of water vapor, one of the tiniest molecules in nature, from getting into the ceiling? Maybe it will take 5 years to rot out the roof instead of 3. But eventually, you’re going to be spending many thousands of dollars for a new roof, just because the builder decided to take the cheap approach and save a little bit of drywall.
Ok, Ted, how would you build a T&G ceiling?

Glad you asked. Here’s how I did it when we replaced our sunroom.
We used high density spray foam. The foam completely fills the rafter bays, as in the photo above. Any remaining cracks are caulked. Then we installed the T&G ceiling to the rafters, like in the photo below:
We’ve had this ceiling for more than 10 years now with zero issues. It’s on the kitchen which gets humid from cooking, but still, no problems.
Would you do it differently if you did it again?
Good question! I might add a thin sheet of foil faced polyiso sheet foam across the rafters before installing the T&G ceiling to add another layer of moisture barrier and to reduce thermal bridging through the wooden rafters. In extremely cold climates, this would be highly recommended as you could still get condensation on the exposed rafters because they transmit the cold much more than the insulation. But in eastern PA where I live, it’s not cold enough to warrant that extra work for the minimal gain given this construction.
I already installed my ceiling, can I seal the wood or the seams?
In a word – no. That might slow the process slightly, but eventually you’re going to regret the decision when your roof rots out and your ceiling is filled with mold. Shortcuts don’t work with T&G ceilings. You have to do them right, or you’ll pay the price eventually.
Can I install recessed lights in a T&G ceiling?
If you’ve read much on this, or any other energy efficiency and building science website, you’ll know that recessed lights are nightmares. Yes, they look clean and some are even rated ‘air tight’, but those ratings are BS. They are filled with holes which let ample moisture through. That moisture will go into your ceiling and cause the same issues.

The compromise I’ll make is if you do a full foam job like I did and then install low-profile LED lights that don’t require reducing the insulation. Since the T&G ceiling isn’t an air barrier anyway, cutting holes in it to mount these lights doesn’t matter. The low profile LED lights look just like normal recessed lights but they don’t protrude into the ceiling cavity. Here’s an example of a ‘canless’ recessed light at Home Depot.

I am so glad I found this article you wrote here. This makes so much sense and I’m pretty sure this is running rampant in my home right now and I am not sure what to do.
I purchased a 1955 mid-century modern a couple years ago and I am quickly learning why these homes belong in California, but alas, I am in Wisconsin. The home has an EPDM flat rubber roof which I already know is failing in some spots. There are areas that are squishy when you are walking on the roof, some recessed low spots where water chills, and there are a few patched areas that I see condensation/mold inside from. Long story long, the roof needs to be replaced, however, that estimate is 50k and up. I do plan to replace it in 2026. That being said, I have just started to notice the tongue & groove (painted) is rotting and some mold where the boards meet the tops of the exterior walls of the house. There is no attic and there were some gutter issues when I first moved in, but I have had the gutters replaced and went with 6 inch due to the size of my roof (2k sq. ft.).
I don’t have many options for flat roofs. EPDM, TPO, and Flintlastic shingle rolls are about all I know of. I am likely going with Flintlastic when I do replace.
In the meantime, I don’t feel comfortable sleeping under the moldy boards I know are above me in my bedroom ad not sure what to do. Should I just remove the tongue & groove and do drywall? Replace the rotted spots of t&g? My roof doesn’t have venting though, being rubber. How on earth can I address this for my family to live mold free other than don’t buy a flat-roofed, mid-century in WI.
That sounds like an actual water leak from your flat roof seeping into the roof-ceiling structure.
The way I’d start is by carefully cutting out one area where you’re seeing the mold so you can see what’s going on behind it. If this has been going on for a long time, it’s likely that the board are heavily rotted.
But first, the mold issue. Health first, always. If you’re not planning to have your roof done soon, the problem is going to get worse. No “mold remediation” is going to solve the problem if the roof is still leaking. The best you can do is clean it with warm soap water. But if you’re worried about mold sensitivity, wear a high quality respirator, gloves, etc. It really depends on how extensive the issue is.
Keep in mind, these are general suggestions. Without actually being there and inspecting it, I can’t be specific or certain about anything.
All that said, based on your description, it sounds like a full roof replacement, probably with the underlying wood structure where it’s rotted. After that, stripping the inner ceiling, repairing rotted wood and going with a traditional drywall ceiling will probably make the most sense.
Ted,
Curious about your thoughts on a traditional ventelated cathedral ceiling in zone 6b. (Spray foam makes me nervous). If we design the heal of the truss large enough for blown in insulation, is installing drywall enough prior to the T&G? Or do you think there is need for additional smart barrier or rigid insulation below the joist?
The main issue I see is doing it well enough to prevent any moisture from entering the cavity. As soon as you install one recessed light fixture, all bets are off. Without any penetrations, it should be pretty safe. Personally, I would only feel safe with a layer of rigid below so I could ensure a large, continuous air/moisture barrier between indoors and the cavity.
And then the next homeowner comes in, breaks out their sawzall and installs recessed cans and wonders why their roof rotted out…
I have new construction – unvented low profile roof which is metal standing seam. We were going to spray foam 2″ and then place R38 batting, the T&G would attach directly to joists. This is in the mountains, so extreme weather / snow. Is the 2″ enough with the R38, or are their other things we should consider.
That should be more than adequate since at R-50 you’re already reducing heat loss by 98%. However, I would double check local building regulations just to make sure you don’t run afoul of anything they may require.
Wow glad I found this site. So I moved into an older home last year that has a sun room approximately 15x20ft. Noticed some small water staining on only one side go the room on the T&G. Had the roof replaced because it was old and thought maybe that would also take care of the leak that I had initially thought was a roof leak. Ive had the roofer out last winter when some of the water staining returned. Him and his guys went over the whole roof to check for leaks. He couldn’t find anything.
But fast forward 10 months later I look up ta day or two ago and the T&G is stained and a little wet The area is about the size of a half dollar. Its only on one side of the room next to an outside wall. The soffit is vented the roof isn’t. The temps the last few days in Illinois have been perfect for this sort of phenomenon. 45 degrees, 90% humidity. Indoor temp is 68.
Thinking once spring hits I can take off some of the T&G to see what’s happening in that particular area.
Do you think this may be more prone to happening on the outside wall because it has more ventilation than let’s say for example the middle of the room that shows no sign of water?
Glad you found it useful and are getting some ideas.
Usually, I’ve found it happens higher up because the moisture tends to accumulate more towards the ceiling. However, I think you might be on to something. With the soffit vented roof, I agree, the areas closer to the vents are likely to be significantly cooler and therefore more prone to condensation effects.
In facts, this makes so much sense that I’m going to store this in my memory banks when thinking about future perplexing issues like this!
Good luck with it. You might just need a bit more insulation up there. It’s even possible that the insulation in that area got compressed or displaced, allowing that section of ceiling to get much colder than the surrounding. Overall though, one little spot is pretty good and likely indicative of a fairly well constructed roof structure.
-Cheers
We built our house in 2017. The main living area has t&g pine ceilings nailed to the rafters with no sheetrock above. We did have to staple up a layer of poly plastic over the entire area before we nailed up the t&g. Above all this is blown fiberglass insulation. I have always had a high humidity problem in the house and couldn’t figure why. We were about to have a whole house dehumidifier installed but tonight I went into the attic to just try to figure this out before installing the dehumidifier. I pulled the insulation back and uncover the plastic poly layer which was wet. I believe this condensation is causing my high humidity. I do not see any mildew at this stage so I was wondering what are my options. Could I cover my t&g pine with a layer of sheetrock from the bottom side? Yeah I loose my beautiful t&g but at this point I need this resolved the easiest way!
I think you’re seeing the result of high humidity in the house, not the cause, so you might not want to do anything drastic yet. The question is “where is the humidity coming from?”
The plastic is stopping the moisture from getting up further where it could do damage in the attic. So it looks like it is doing its job.
Do you have any sources of moisture in the house that might be driving the humidity up? Lots of house plants? Or are people showering without running the fan (suggest leaving the fan running for a half hour after you finish showering to flush out the moisture.) or do you open the house up for fresh air in the morning when it’s really humid out? These things can all lead to excessive indoor humidity.
If all else fails, definitely use a dehumidifier. But that’s a band-aid fix that costs money to run. Best to eliminate the source of moisture.
It could also be coming in from crawl spaces under the house if you have any. Or through basement foundation walls, if you have high ground water levels. Efflorescence (white powder on foundation walls) is a sure sign of moisture coming through the walls.
Feel free to ask follow up questions if you want to discuss this further.
is there anyway we could talk via phone? I have so much to say that writing would be harder.
I prefer to keep discussions here in the Q&A so others can learn from it. Perhaps you could consolidate your thoughts and post them here.
I have been reading every question and response here since I ran into issue years ago. I love this resource continues and thank you SO MUCH for your time.
Thanks so much for your kind words!
the house is not on a crawlspace but a 3ft raised monolithic slab. Moisture readings have been checked on the floor multiple times as we have 3/4 solid oak glued there. The humidity in the house gets high during the hot days when outside humidity is lower and surprisingly humidity gets lower in the house at night when the humidity outside is higher. Attic temps go up during day and humidity downstairs goes up. Attic temps go down at night and humidity downstairs goes down. Like I said, my t&g pine is nailed directly to the roof trusses with only a layer of poly plastic between the t&g and the attic blown insulation. The poly plastic was wet last night so I thought that moisture was from the two temps (attic hot and downstairs cool) causing the plastic to sweat and therefore creating the humidity downstairs. We have no plants or moisture causing things downstairs and exhaust fans in bathrooms are used. I have a small room dehumidifier downstairs to help but its a job keeping it empty during southern summers. Should that plastic be wet?
That’s useful information.
First – the “Relative Humidity” drops when it hotter out because RH is a measurement of how much moisture the air can hold. At higher temperatures, the air can hold more, so the RH drops even if the same actual amount of moisture is the same. But, and this is key – when you bring that hot air into the house, it cools down and the RH rises. Same air, different temperature, different RH readings.
Second – the water vapor in air rises, so it will collect at the ceiling. With your T&G and plastic vapor barrier, the moisture stops at the ceiling and, if it’s high enough, you’ll get condensation. Since the temperature often drops pretty quickly when the sun goes down, it can create conditions for the condensation to form.
Third – sweating is always caused by humid air coming in contact with a surface that is cool enough for the condensation to form. The warmer attic will actually minimize the chances of condensation. Quite possibly, during the day when the sun is shining on the roof, it will be warm enough to evaporate the condensation back into the air. Importantly, this cannot raise the humidity of the interior of the house because that condensation came out of the house’s air in the first place.
Now to your likely solution. What you are describing are the classic symptoms of a leaky air duct system on your air conditioner. I’m assuming you have central air. If you don’t, all bets are off!
I’ve seen many situations like this. When a “leaky” AC runs, they suck in some humid outdoor air and blow that into the house. This rapidly raises the humidity levels in the house. This also explains why the humidity goes up when it’s hotter out because the AC runs more, sucking even more outdoor humid air into the house.
Leaky duct systems can also cost a lot more to run because the job of the AC is to both reduce the air temperature and remove humidity from the air. The more outside air that gets sucked in, the harder/longer the AC has to run.
These problems are very common when the AC unit and/or ductwork runs through attics or basements or under the house or in garages. You might have seen photos on this site showing pictures of AC’s with their filter port uncovered. These can suck huge amounts of air in, bypassing the filter and causing all sorts of humidity and air quality issues. I’d suggest the first step is to take a close look at your AC unit and see if it looks air-tight. If it’s not, you want to air seal it with some good foil tape after thoroughly cleaning the area so the tape sticks well. I’ve seen a lot of systems that look like they were taped up but the tape isn’t even sticking to anything!
A second possibility that I’ve seen is that one of the return air ducts has simply become detached in the attic (or wherever it’s running). This will then allow the system to directly suck in hot/humid air and probably driving up your operation costs 30-50%! This is the simplest to solve because usually it’s sitting right in the attic, kicked off the connection by the “cable guy” or someone else working up there.
There’s also a possibility that your home uses wall or floor or ceiling cavities as makeshift ducts. There are a lot of those in this area of PA and NJ. It’s a horrendous building practice! For example, in basements, they’ll just staple some cardboard to the floor joists and shove some duct into each end and call that space between the joists a “duct”. Of course, air gets sucked in from everywhere.
Sadly, if your construction is like that, it can be very difficult to remediate the problem as it requires tearing open walls and installing real ductwork.
If it seems like this might be the issue, I’d strongly recommend finding someone who can perform a “duct blaster” and a “blower door” test on your home and inspect it with a thermal imaging (IR) imaging device. In a couple hours on a hot afternoon, they should be able to see where the hot (and humid) outdoor air is getting sucked into your home. That will allow you to focus your repair efforts on the specific problem areas. If you don’t, you’ll be flying blind, trying to fix things essentially randomly. The tests should cost something in the range of a few hundred to a thousand dollars, depending on where you’re located and how large/complicated the house is to diagnose.
That covers the main problems I’ve seen that can cause problems like you’re seeing. I’ve seen some very expensive houses that have these very issues, so it can happen to anybody.
Thanks so much for this. I have totally exhausted myself trying to solve this and you just can’t imagine what it’s like to finally find someone that can understand what I am saying and offer help! I would love to send you some pics or short videos showing my ceiling, attic, ductwork, and ac handler. Do you have a way for me to send this, here or email? My handler and ductwork are located in the attic. I have 3 returns located downstairs( 1 story house) i see no signs of condensation on the air vents which are in the ceiling and no signs of mold or mildew growing around the air vents or light fixtures. The plastic vapor is wet under the blown insulation. I am about to go up to the attic and check now and I will also check the RH with my fluke meter to send you…
I’m in Gainesville, FL and we just moved into a house with T&G along the ceiling above these large main support beams that has begun having condensation issues here in our first “winter”. It looks like construction of the ceiling and roof was installing the large support beams, installing the T&G boards, a black type of vapor barrier (possibly?), and then there is framing and roofing materials above that. Here is a video documenting the construction and the condensation issue:
I’m not really sure where to even start for a DIY approach to addressing the condensation based on the construction I described above. If I were to bid this out or to seek professional input on the state all of the wood up there, who do you suggest I should contact. Looking for some help and direction, thanks in advance for your time, and thanks for the great post, very informative.
Hi Chris, thanks for sending the video, that’s super helpful in understanding the issue and construction better.
It is interesting that the condensation and wood discoloration is particularly bad in that one area, though it’s clear that all along the main beam there are issues. The challenge is going to be how to rectify the situation without major reconstruction. The positive thing is the issues seem limited to the peak and a few planks on either side.
In that cross-section pic you sent, it looks like they tried to do that right thing with a layer of vapor retarder and foam board. That should block bulk air movement and minimize condensation issues inside the cavity (behind the T&G and foam). The question is, what’s going on near the peak and especially at the one area with really bad problems.
A couple of things come to mind.
1 – could something have happened to the foam board in that area? Perhaps some roof work was done and the foam board was removed in that area.
2 – If not (1) there would have to be a source of air that blows on that area more than the surrounding areas. This is a bit of a long shot, but I’ve seen issues arise where HVAC vents blow on one area of a ceiling causing the worst issues there.
I also wonder if the construction up near the beam made it difficult to insulate up there. Or perhaps there’s a ridge vent installed which is allowing cold air to enter at the ridge and cool those boards near the peak enough to cause the condensation?
It’s also interesting that the worst discoloration is on one side of the beam. Do you know if the beam is aligned such that the unaffected side gets more daytime sun than the other? For example, if that roof is south facing, the roof might heat enough during the day to drive out the moisture on that side, while on the “cold” side, the moisture can build over time. This isn’t necessarily relevant to the solution, but it could explain the difference.
As for suggested solutions…
I would want to first determine what’s causing the worst of the condensation. Perhaps very carefully cutting out one the plank near the peak that’s dripping. I’ve done cuts like this with an oscillating saw (see this link for example: https://www.boschtools.com/us/en/products/gop40-30c-0601231011). That would allow cutting out the one plank without damaging the foam behind it. You really want to understand what’s going on there before diving into a large scale renovation. It might be that you just need to do some extra insulating near the peak. Or it could be some fundamental design issue.
The other thing to consider is that it might just be excess water vapor building up at the ceiling level (since it floats to the highest point). Even if everything constructed properly, the humidity could be building up and causing the problems you’re seeing. Since you live in a humid climate, it’s quite possible that the humidity at the ceiling level is very high. Air circulation (fans) at the peak could greatly alleviate the issue as could general dehumidification of the space. During the warmer months, air conditioners remove a lot of moisture. During the winter when you’re not using air conditioning, and the roof gets cool at night, you set up conditions conducive to these issues. Ventilation and dehumidification could be long term remedies (that don’t require a complete rebuild of the roof structure).
Another possible long term remedy might be to increase the insulation a couple of feet to either side of the peak (a bit beyond where you’re seeing blackening or mold). You might just add another inch or two of foam board inside the existing ceiling, sealing carefully all along the beam, and then put new T&G or other ceiling material as an aesthetic surface to hide the foam. You’d end up with a “step” in the ceiling which might be a bit odd looking, but it’s a lot easier than ripping off the roof and rebuilding it with thicker insulation. I’m just trying to think out of the box that could provide durable long-term solutions without being too disruptive.
If you’ve made it this far, here’s something else. Get yourself a remote reading thermometer (i.e. https://www.amazon.com/Klein-Tools-IR5-Dual-Laser/dp/B01DR066WU/ref=sr_1_18) and compare the temperature at the peak and down where you’re not having issues. Best to do it either late at night after the roof has cooled or first thing in the morning before the sun has warmed it. If you notice a marked difference in temperature, like the roof peak T&G is 55F and the lower sections are 65F, that would be enough to give you condensation issues if the humidity is high. Note – areas that are actively wet will give erroneous readings, so pick a section that isn’t dripping wet but might just be discolored.
It’s a lot of info. Start small and test. For now, you might just want to use some fans mounted near the peak to improve air circulation and slow the moisture damage while you decide exactly how to proceed. Good luck!
Ted, I live in Illinois and it gets below zero sometimes. Will 4” of closed cell be sufficient enough? Also I have 8 low profile recessed lights that will be in my tongue and groove shiplap ceiling. Should I do drywall or add a thin sheet of foil faced polyiso sheet foam across the rafters before installing the T&G ceiling to add another layer of moisture barrier and to reduce thermal bridging through the wooden rafters?
Pretty chilly 😷. I’d probably go 5-6″ to be on the safe side. With the foaming, you should be good to go. Any other layers will reduce the ability to circulate the air in the space behind the t&g. No problem with the lights as long as they don’t go through the foam. The heat from the fixtures will actually help keep the air space warmer which will reduce the chance of moisture issues behind them. With foam, you shouldn’t have the problem that you get with fiberglass where the moisture goes through the insulation and sticks to the cold surfaces on the roof side.
Hi Ted,
We have a 1 year old home on Long Island, NY, near the water. I am concerned about our ceiling/roof, especially after reading your article. Our roof is a 2/12 pitch shed roof, cathedral ceiling. Inside out we have T&G pine nailed right to 2×12 rafters, kraft faced R-38 fiberglass between rafters, then styrofoam baffles running the whole length of the roof which keeps a 2″ air space all the way from soffit to soffit under the roof deck. Then 3/4 plywood roof deck, ice and water shield, standing seam roof. I realize now no air barrier of any kind in this assembly.
No issues of water coming out of the ceiling, but on windy days i can put my hand up and feel a breeze coming into the house from some of the less perfect areas where the T&G meets the drywall walls. Told our contractor, he said it was from too much ventilation, so he sent guys up and reduced the size of the soffit vents from about a 3/4″ continuous gap to 1/4″. Not sure that did much.
Do you think we are headed for bad news? Thanks very much for your time.
The drafts were certainly a sign that air was moving through the cavities. While I efficient, the air movement is good for flushing out the moisture that will get in there. As long as you’re not seeing condensation issue, you’re probably ok for now. Without those vents, you’d likely have serious issues.
The trick is, will there be certain conditions, such as very cold days, that might be so cold as to freeze the moisture in the ceiling. Then, when it thaws, it could drip onto the T&G ceiling and into the room. Keep your eyes open for things like that. If it happens only very rarely, then the moisture may have a chance to evaporate before doing harm. If it’s more common, then you’re going to want to address the ceiling before more serious issues arise.
Hi Ted,
Great article and it’s awesome that you are sharing all this knowledge. I’m currently remodeling an eichler (in northern CA) and would like to get your advice re sealing the T&G ceiling\roof deck against moisture from the inside. Do you think it’s a good idea to seal the T&G seams from the topside with an air barrier sealant like VISCONN to prevent potential condensation\moisture issues or the use of a peal and stick air barrier membrane would be a better choice? Or maybe not required and let it to easily detect leaks? The roof assembly from bottom up is T&G, polyiso insulation, SPF, and elastomeric coating. Your thoughts would be highly appreciated.
Best,
Guo
If there is already polyiso directly underneath the t&g material that should block the moisture. It depends how the layers are constructed. If the poly iso is just in between the rafters then sealing the edges should dramatically reduce moisture movement. The way I like to think about it is if air can move from one place to another that will carry moisture which causes the problems. Anything that will effectively block air from easily moving from inside the house into the cavity where it can condense should do the trick. The reason spray foam works so well is that it doesn’t depend so much on detail work like the other methods. You just spray it in and it seals everything up. Peel and stick is great but I can never get it to stick permanently. VISCONN looks like it could work really well as it would get in all the cracks and seal things up. I haven’t personally used it, but in theory it looks like it would be a great product for that use. As noted, the main goal is simply to stop airflow as effectively as possible so use whatever you think will do that most effectively in your application.
Can you install drywall on the tongue groove?
Yes, many have just gone right over it after having these types of issues. Best to open it up if in some places you’ve been having water issues to ensure that the inside cavity is in good shape and there isn’t actually a problem with the roof.
Ted,
I have been reading a number of articles here and I have also come looking for answers regarding a wood T&G ceiling. I am a contractor and have an issue I have not been able to resolve.
The conditions are as follows:
Tall ceilings (16′-24′) in a modern house with low sloped / flat roofs.
TPO and Metal combination on different sections.
High humidity in summer caused expansion of T&G to the point of collapse.
16″ plus joists with open cell foam.
T&G fastened directly to joists / rafters.
There are recessed lights and I am not sure of insulation between lights and the roof itself.
I believe we are climate zone 7 in northern VA.
I am in process of having blower door testing done to locate infiltration points.
Do you do consulting for projects like this?
Thanks,
Jason
Ted, I came across your article and I am now conflicted on how I should install my T&G Ceiling on an outdoor porch in zone 9 in Florida. I plan on removing the existing drywall which has no insulation behind it and nailing the T&G directly to the trusses. I am using an oil based stain wood protector on at least the ceiling part and possibly the back side of the wood. In Florida our soffits vent air directly through the attic to the roof vents and are not sealed off. I also plan in installing recessed lighting. Should I install a plywood backer first then nail the T&G to the plywood or will I be safe nailing directly to the Trusses? Our humidity stays in the range of 60-80%. I want to make sure I am installing this ceiling correctly. Thanks for your time.
Hi Jeff,
Maybe all of the T&G issues I’ve seen are in cold climates where moisture gets in from the inside of the house, goes up through the T&G and condenses on the cold roof deck. In your situation, you’ve got the moisture on the outside, wanting to come in. However, it’s an outdoor porch, so if I understand correctly, the temperature and moisture inside the room and outside will be the same except for the heat beating down on the roof, warming the room.
So, if my interpretation is correct, there’s not a lot to be gained from doing anything beyond nailing up the T&G as you suggested.
Great post! I’m in climate zone 6 (6800ft in Colorado) and have a cathedral 2/12 pitch with 2×10 rafters for my outdoor deck. We want to add T&G ceiling but I’m concerned as we do have heaters out there and two sides have heavy curtains. Temperature can be 15 degrees above ambient (and probably higher at peak of ceiling). Can install foil faced polyiso sheet foam between the rafters and seal with foil tape instead of below the rafters? Reason is to save on ceiling height but realize this will be a lot more labor.
Hmm, this is a unique application. I can’t say for 100% sure, but outdoors like this, you are unlikely to have the type of issue I wrote about. When it’s cold there, the moisture holding ability of the air is going to be very low, and any moisture from people (breathing, etc.) will get flushed out very quickly. If the heaters are gas heaters, they’ll generate a fair amount of water vapor, so it’s possible that could be enough to cause condensation issues.
If we assume that there’s enough moisture to be a problem, then, to be safest, I’d use insulation between the rafters as you suggest and, as a compromise, use a 1/2″ sheet of foil-faced polyiso under the rafters. The thin sheet will provide a thermal break so that you don’t get direct cold transmission from the rafters to the T&G as well as providing added protection from moisture sneaking up into the roof cavity. You could then use batts between the rafters which would be easy to install. Just draw lines on the poly-iso to mark the centers of the rafters to ease installation of the T&G.
wonderful written article! Thank you for taking the time to write it. It open my eyes, and left me with some new question too ?!? Maybe I can pick your knowledge, as I’m about to start preping the T&G board this week.
I’m remodeling what they call a mother-in-law suit (1955) in the back of my main house, I went with a 5.5″X1″ T&G pine. I’m keeping the existing +1/2″ drywall/plaster board (still good, but the finish is another story to say the least 🤮) I’ve already installed and leveled the furring strips. So now I have the space between the finish ceilling and the T&G that I plan to fill with (polyiso) foil face foam insulation board, fill any small gaps between furring with can spray foam. Maybe finish with foil tape between the insulation board and furring strips.. that means the whole area would be somewhat sealed.. what do you think? my climate: Florida coast, no heater as the temp hardly ever drops below 50 deg for a few days a year, most of the year, it is +90 degree, super high humidity. There is zero insulation in the attic, as there little to no access to most of the attic (next time we do the roof, we will remove boards to allow access for blown insulation, but thats 10 years down the road)
So what you think?
Oops, somehow this slipped through without me seeing it.
ok, I see. In your application, your solution sounds good. With the mild “cold” weather, the ceiling is unlikely to get so cold that the condensation issue will be bad, so the insulation should provide an added safety margin as well as helping insulate against the brutal summer heat.
The coastal humidity is always challenging, so I wouldn’t be surprised if you get some “sweating” but as long as you’ve got AC to maintain humidity to a reasonable level in there, it should be ok.
Keep in mind, no matter what, you’ll probably get some condensation if you open the windows and let in fresh air (and moisture). But if you close it up and run the AC afterwards, probably no harm done.
As to avoid removing the tongue and groove ceiling and adding drywall, Can we try to add a vapor barrier shield and spray the cavity with spray foam and replace the aphsalt? We need a short term solution for now.
If you’re ripping off the roof, then sure, you can spray foam from the top side down to the back of the t&g after putting in a shield to keep the foam from oozing through the t&g. You might be able to get away with just spraying foam directly on the back of the t&g but it’s a little risky.
Hello Ted, I’m a roofing contractor in NE PA need I say more uugg anyway I found your article very very helpful and I just forward it to a costumer of mine that can’t seem to except that his roof is NOT leaking….so my question to you is let’s say you do everything that you mentioned with the spray form procedure properly, should you have soffit and ridge vent installed as well?
My stock answer is follow the building code because you don’t want to get dinged by the inspector. Personally, I don’t really see the need for it in our climate, but I wouldn’t want to advise anything that the building inspectors would give you a hassle about
Hi Ted, this article nearly brought me to my knees in tears because I was so happy there was a reason my T&G ceiling was leaking. The other day there was so much water dripping through the cracks that I thought I was in a tropical rainforest! We purchased our home 3 years ago and noticed during the winter strange “sweating” happening down the beams of the ceiling. The previous homeowner installed a new roof and ventilation thinking it would resolve the problem. The same roofing company came out and just last month ripped up the roof and installed 3″ solid foam insulation thinking that would help with the “sweating”. We’ve noticed that during extremely cold weather after things start to defrost the sweating happens, especially when our fireplace is going. We live in Portland. We are unable to do the work ourselves – are there specific contractors that we should look for who would have the best expertise in this situation? Any help would be appreciated!
Glad you found it helpful! Your reaction is common. I don’t know why more builders/contractors don’t immediately know about these problems since they occur so often!
Adding the foam insulation should have improved things quite a bit, but perhaps it wasn’t air-sealed, so the moisture is still slipping past the foam and condensing on the underside of the cold roof deck? Or, do you have recessed lights that might be allowing all the moisture to go through the “cans” and up into the roof? If you’ve got those, then they likely didn’t put the foam above the lights (for heat reasons).
It makes sense for it to defrost when the fireplace is going since all that hot air is rising up to the ceiling. that supports my theory that the foam isn’t air sealed. The hot air is probably rising up, getting past the foam and melting the ice on your roof deck. That melts and drips back into the house. Argh!
The “easiest” solution would be to screw two layers of foil faced poly-iso board foam right over the T&G ceiling. Tape all the seams with foil tape. Then put the second layer on with seams at the center of the first layer (so the seams aren’t anywhere near each other). Tape those seams. Then install a new aesthetic ceiling on top of that. That will completely block moisture from getting into the ceiling cavity. If you have recessed lights, of course, do NOT reinstall them with new cutouts etc. or you’re rendering useless all the work to avoid the problem in the first place. You could run the wires, seal any penetration with spray foam/caulk around the wire, and use surface mounted lights. Yes, not as pretty, but they eliminate one of the most insidious construction failures built into millions of homes…
I say that’s the easiest solution because the alternative is to pull all the T&G boards down, spray foam the underside of the foam they just installed so as to completely air-seal the assembly, then put new T&G back. But that’s much more labor intensive/costly.
Feel free to drop me a note with more details if this doesn’t make sense.
Back in old BUR (Hot Tar) days for low slope roofs, I remember the roofers mopping down two layers of insulation, and always staggering the joints, especially on T&G roofs. Looking back, the old guys (and specifiers) knew something. It kept the air from flowing thru the joints. Seems the thickness of the insulation doesn’t matter, but as you say, stopping the air flow does. We have mild weather here in Northern California, but TPO and PVC roofs are so highly reflective (hold no heat during the day) that ice will form under them on a T&G substrate that has no air barrier. The temperature need only reach down to 32 degrees outside for a couple of hours overnight and then crunch, crunch, crunch the next morning when walking on the single ply membrane. And soon it melts and “rains” inside…
Ted,
This a very well written article, clear, concise and simplified so anyone could understand the premise. I only wish I read this three years ago.
We have a large “sunroom” (it’s located on the North side of the house so it’s not really sunny) its 100% pine T&G walls with a pine T&G cathedral ceiling and tons of windows . The previous owner also had a hot tub built into the room, this was our first project when we bought the house was removing the hot tub as we attributed all the water damage in the room to it. Then we realized the roof was leaking (which it was, but after reading this article it’s clear that wasn’t the serious issue) so we removed the old roof, I removed all 5 skylights, added additional fiberglass insulation to each rafter bay, added rafter vents on top of that, all new plywood, I&W, and a standing seam metal roof. Still leaks, so now I had the chimney rebuilt and reflashed this summer, To my dismay, yesterday (Thanksgiving) hours before we had a full house…. Leaks, lots of leaks on a perfectly cold clear day… this has been a nightmare, an expensive nightmare. Now it’s clear from your article all that money and time was spent chasing the wrong problems. I’m just glad I now know the cause, thank you.
I have two questions for you.
1) It’s clear the T&G ceiling needs to be removed, and replaced with an air tight drywall unit, but do I need to do the same with exterior walls in the room?
2) Can I do all of this work PROPERLY from inside the room or do I need to remove the roof again?
Wow, an indoor hot tub. The amount of moisture those things can throw off is astounding. Good on you for removing that!
Yikes, sounds like the ongoing problems are a real nightmare. After all those repairs, I’d be depressed 😦
If it were my home, I’d do some “exploratory” deconstruction first, before doing anything dramatic. Given the drips, you undoubtedly have a good idea where the worst problems are. It’s possible to carefully cut out a T&G board (I used a thin bladed buzz saw tool for this). It allows removal of boards with minimal damage to the adjacent ones.
If you cut out a strip up to the peak, you should see exactly where the condensation is forming and learn if there’s been any damage to the roof deck. Hopefully, your new roof is intact and not rotting. A little discoloration is bound to have occurred but if the wood is still hard, I wouldn’t worry about it yet.
Same deal for the wall. Just remove a board or two and see if there’s any water damage behind it. There’s a chance that wall is ok since the water vapor rises. Usually these problems start from the peak and work their way down.
I’d also think about if there’s anything in that room or your home that could be raising the humidity levels too much. Humidifiers? House plants? Dirt crawlspaces? Something caused your Thanksgiving ‘event’ – try to figure out what was different on that day. Was it a colder, clearer night? That can freeze the roof, leading to ice buildup underneath as the condensation freezes. Then, when the roof warms during the day, the ice quickly melts and causes a lot of dripping.
So, assessing the potential damage and cause of moisture problems is step one. Then you can figure out how to proceed.
A best-case scenario is that the walls are in good shape without signs of moisture problems and the ceiling only drips rarely under specific types of conditions that you identify. Under this scenario, you might be able to get away with just using a heavy duty dehumidifier in the sunroom in the day leading up to the conditions that cause the problem. For example, if the dripping is caused by cold, clear nights below 35 degrees (I’m just making this up as a “for example”), then whenever there’s a weather forecast for those conditions, you start using the dehumidifier. The key is to reduce the humidity before it causes problems.
Answering your specific questions – if you do have to do a full rip-and-replace job, you should be able to do that from within. There shouldn’t be a need to rip off the roof again unless is shows severe damage.
As for the walls, that will depend on what your inspection reveals.
For now, I’d just run a dehumidifier in there to reduce the humidity risk and chance of more dripping and liquid water buildup inside the ceiling/walls. Good luck!
I was wondering if I could get your thoughts on a simpler, cleaner alternative than tearing the ceiling down and spraying in foam. What if I nailed 2 x 2 furring strips under the existing rafter boards, over the existing T&G. Between these boards we would put foam board insulation and then seal all cracks with foam spray and/or Tyvek tape. This would create a moisture barrier and add a little insulation. Then we would finish off with an MDF Armstrong snap-together T&G looking ceiling. Do you think this might prevent the drips from our ceiling in the cold weather?
Thanks,
Gary
Certainly adding an “inner ceiling” would greatly reduce the moisture moving through the existing T&G which should eliminate the dripping. You could screw foam board right to the existing T&G then put your new MDF over that. Best for moisture control would be to use two layers overlapping the seam of the second layer at the middle of the first layer and tape the seams.
Hi Ted,
Last year, we had a T&G ceiling installed in a cupola that was added to a geodesic dome. It was installed right up against the rafters with fiberglass insulation. Very recently we’ve noticed two issues. Two areas of pine that were sealed to the drywall part of the ceiling with caulk have cracked (likely due to the pine shrinking). Almost immediately, water has been dripping out, and a small amount of mildew is developing.
The other issue is the pine itself. Moisture is developing on the boards themselves that clearly looks like condensation and not a roof leak. The pine is mildewing very very quickly as a result. Within about 10 days nearly a third is covered.
Based on my research before we had the T&G installed and after this incident, I feel the problem is that cupola is improperly sealed off.
My contractor, however, believes it is an HVAC issue. We’ve had two companies come out (one specifically recommended by our contractor), and both have said our systems our fine and adequately cooling and drying the area. We also run three humidifiers 24/7 in hour home–we live in north central Florida. Our measurements indicate 45% humidity.
I’m having an architect friend take a look later today, but they probably will not be able to provide any guidance.
It is imperative we fix this issue immediately before irreparable damage is done to the roof, but I’m personally stumped as to how to proceed. I do NOT want to go the route of installing expensive ventilation when I’m 99% certain it’s not the cause.
Should we just pull off the T&G and start over? Maybe skip the T&G all together and go drywall? If you do remote consults, I’d be happy to discuss the terms.
Yikes!
First – you say you run three humidifiers – I’m guessing you really mean dehumidifiers since you wouldn’t want more humidity in Florida during the summer.
45% humidity sounds great for Florida. My house is 49% right now and we never have moisture problems.
For condensation to be forming, you need a surface that is cool enough. If you’re not getting condensation on your walls near the ceiling, you shouldn’t be getting it on the ceiling. However, it may be that the drywall is soaking in the moisture more so you don’t notice it. Still, if it’s so bad as to cause all this mold growth on the ceiling, I would think that you’d be seeing it on the walls.
You are correct that you want to fix this ASAP.
I’m very concerned about the water dripping out at the crack. The ceiling cavity must be a mess.
With 45% relative humidity in the house, condensation requires a much cooler surface than room temperature. Are you in a part of Florida with wide day-night temperature swings? I usually only hear about that in the desert climates. The only way I can think of to get conditions that cause condensation in Florida would be if the air conditioner vents were blowing onto the ceiling, cooling it 15-20 degrees. You can also get it if the ductwork is running in the cavity and lots of cold air is coming out, chilling the ceiling.
There are a few things I would do if this were my home.
1 – check the easy thing – air conditioning vents. Are they chilling the ceiling and causing the condensation?
2 – check behind the area where water is dripping out. You say it’s at a junction between drywall and drywall. Carefully cutting out a section, maybe 1-2 feet square, would let you poke around in the ceiling cavity and determine if it’s soaking wet in there. If it is, you need to dry it out ASAP or you’re going to experience a lot of wood rot and expensive repairs.
3 – until you determine the problem, you can blow a fan or fans at the ceiling where the moisture is building up the most. This will help dry out the condensation without cooling it off like blowing air conditioned air would. This could buy you some time.
I hope this helps. You’re absolutely right – you really need to get to the bottom of this soon.
Ted, I have spray foam insulation and T&G ceiling. But I still fight condensation especially in the hot summer months. My home is less than two years old. Last summer the the T&G started buckling and we fixed those boards. Now we are seeing bucking return and drips coming from the ceiling again. My ceiling at the highest peak is 23 feet. Should we consider exhaust fans between the ceiling and roof?
Summer condensation is a different beast from winter condensation though of course the physics is the same – humidity in air coming in contact with a cooler surface.
During the summer, warm air can contain a tremendous amount of moisture. That warm moist air rises up to the ceiling. Probably, at night time, the roof cools off enough to allow the condensation to form on the ceiling.
Are you opening the house up at any time during the day to air it out? Sometimes what happens is people will do this when the air is cool in the morning or in the evening and that allows saturated air to fill the house which leads to condensation problems. If you are doing that, I would suggest not opening the house up and using the air conditioner because that will keep the moisture lower in the house and minimize the chance of condensation.
I had one client who had terrible problems with floors warping throughout the year. They never opened their house and ran the air conditioner during the summer, but the humidity inside the house remained high in the summer and low in the winter. I traced this to a disconnected duct connection in the garage, where the air conditioner was mounted. The system sucked in air from the garage, essentially just outdoor air, and distributed that around the house leading to all the problems. In addition to moisture problems, it drove up their electric bill some 30%! So it’s possible that your ductwork is very leaky, leading to these problems.
If you don’t think your problem is due to opening your house for fresh air, then I strongly recommend having your duct system pressure tested. This will determine how leaky your ducts are and allow you to attack the actual source of the condensation problem.
Ted, thanks for your excellent articles and Q&A, including tedsenergytips.com/2011/03/13 Cathedral Ceilings.
I am installing everything above the beams, prioritizing flame retardant Rockwool insulation, and location is CZ2 Novato CA, with lows rarely below 40 degrees F.
As an alternative to foil faced foam or sheetrock with taped joints as a vapor barrier just above the T&G ceiling, you ever consider impermeable peel-and-stick membranes, directly over the T&G, and why or why not?
What would you change about the setup below?
From the top down….
-2:12 single pitch standing seam metal roof, with minimal venting at top and bottom eaves;
-Toprock DD (rockwool) double layer of 4″ panels, staggered, ~ R30;
-Peel-and-stick impermeable membrane – adhered to top of T&G ceiling – but at exterior walls near top and bottom eaves, interrupts T&G by diving through the T&G and lapping to the Tyvek home wrap.
-2×6 T&G ceiling
-6×10 beams fully exposed, 4′ o.c.
Would it improve or worsen the risk of condensation inside the roof, to include an air gap under the roofing, and allow venting at the top and bottom eaves?
Thanks, Brian
Hi Brian, thanks for the words of encouragement.
My visualization of what you describe is like an Escher! The Peel and stick adhered to the T&G? Then lapping to the Tyvek? I don’t get how that happens. Sorry if I’m being thick, it’s probably obvious but I just can’t visualize this.
What I could see is the peel and stick facing the insulation and rafters, with the T&G nailed through the membrane to the rafters. That would certainly be highly moisture blocking as long as the seams were carefully sealed. I would think the foil-faced foam board would be easier to work with and to seal as well as less costly per square foot, so I’m not sure of any advantage that the membrane would have. But again, since I’m not really visualizing your proposal properly, I’m probably missing what you’re thinking of.
Oh, and the air gap under the roof would help things as it would help flush out any moisture that invariably works its way into the sealed cavity.
Ted, I appreciate your response.
I borrowed the membrane idea from another builder who did include a picture: https://tinyurl.com/y22k2sb4
I’m more confident now about venting this type of assembly; I’ll incorporate bug screen and allow air flow under the metal roof with a 3d mesh underlayment, or wood strips.
Thanks,
Brian
Got it. As long as the air/moisture barrier is continuous and well sealed, that makes sense from the building science perspective.
We built our house back in the early 80s tongue and groove on the ceiling but we sheet rocked first mud and tape to see you all air gaps and aid in fire resistance.
That’s a no brainer especially today in these times in the ages of information and education. If that was a contractors build he should be demoted down to building dog houses and bird houses.