In the first article of this series, I discussed a lot of the theory behind attic insulation that you should know before taking on your insulation project. If you haven’t read it, please, click the link and do your best to understand the basics before proceeding.
Condensation – killing houses slowly but surely

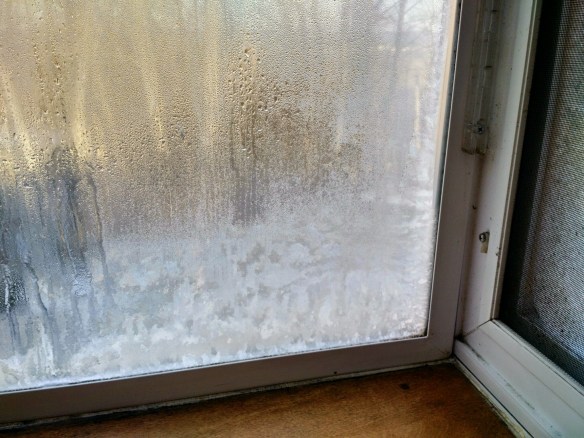
This house definitely has problems
This winter, most of the questions I’ve received have been about moisture buildup in attics or cathedral ceilings. And all have the same answer – humid air from the house is rising up through all the little cracks and holes in your ceiling. Once it gets into the attic space (or the space between the roof and the ceiling of a cathedral ceiling), the air cools rapidly and the water held in the air condenses on to a near-by cold surface – usually the underside of the roof or the roofing nails.
Once this happens, the water drips into your insulation or soaks into the roof sheathing. If this happens once and dries out, it’s no big problem. But during the course of the winter, this happens again and again, and before you know it, it’s raining inside the house as water leaks through holes in the ceiling.
There’s a saying – “there’s no such thing as a small water problem.” But often people will try to put a band-aid on them. Unfortunately, every day a water problem is neglected, is another day closer to serious structural problems and tens of thousands of dollars of repairs. So it is in your best interest to deal with water problems as seriously as if your house was on fire. Deal with it today, or you’ll be really sorry tomorrow.
What a moisture problem looks like
Let’s look at the underside of a roof that has experience this repeated wetting from condensation:

Fiberglass insulation against roof deck in an attic leads to roof failure

Moldy roof deck above a cathedral ceiling
The first thing knowledgeable people ask is: “will adding more ventilation eliminate the problem?”
We’ve all been told that you have to have air flowing through the channels, from the eaves (soffit vents) up to the peak (ridge vent) in order to flush out the moisture. But this is only part of the story and it doesn’t guarantee anything. In some cases, it makes the problems worse.
The purpose of insulation in winter is to slow the heat loss from the house and out the roof. Take a look at the photo at the top of this article. Half the roof has snow, the other half does not. The half where the snow has melted is a clear sign of heat loss from the house. The heat warms the roof sheathing and melts the snow.
Recall what you know about condensation – condensation occurs when moisture in the air comes in contact with a cold surface. The roof is above the insulation, so it’s supposed to be cold. If it were warm (like the right half of the photo of snow), then condensation would be less likely. The situation is a Catch-22 – good insulation equals cold roof. Cold roof plus humid air equals condensation. Ugh!
Given these conflicting issues, what do you do?
Preventing moisture problems in attics and cathedral ceilings

U.S. EPA Air infiltration poster
The answer is simple – reduce the amount of humid air that can come in contact with the cold roof.
In the winter, almost all the moisture comes from inside the house. It rises up, along with the warm air, finds every tiny crack in the ceiling, and gets up into the attic or inside the cavity under a cathedral ceiling.
Step 1: reduce moisture in the house
The first thing you want to do is reduce the amount of water getting into the air from inside the house.
Ventilate when showering
 The most common source of large amounts of moisture is the shower. When you shower, you create a “worst case” scenario – hot water saturates the air. That “super saturated” air will immediately dump the humidity onto any cooler surface it touches.
When you shower, you must run the bath fan during and after your shower until the all the excess moisture in the bathroom is flushed out. Usually, this means allowing the bath fan to run for approximately 30 minutes after you shower.
If you have a door on the bathroom, keep it closed until all the moisture is flushed out. Never shower with the bathroom door open because the moisture will flow out into other areas of the house that are not designed to eliminate the moisture.
Bath fan tips:
- Ensure the fan actually works. Put a piece of paper under the fan. It should suck strongly to the fan’s intake. If it does not, then the fan may be improperly vented.
- Check the fan installation. Pull down the grill under the fan and look for gaps between the ceiling and the fan. Use canned foam to seal these gaps.
- Make sure the fan vents through the roof. Venting the fan into the attic is common and exceedly stupid as it virtually guarantees a rotten roof. The duct from the fan should be as short as possible and go straight up through the roof. Your fan is worthless if the duct runs 50 feet across the the attic then lays on the soffit.
- Install a humidistat that automatically runs the fan based on humidity levels. There are even bath fans with humidistats built in now but I prefer separate switches with humidistats like the one linked to above or this one. Why? Because you are less likely to forget to turn it on. The humidistat is wired in parallel with the normal switch so either one can activate the fan.
Ensure the dryer vents outside
Far too often, dryer vents take long paths to get outside. This leads to inefficient or even dangerous operation. If your dryer takes forever to dry clothes, chances are good that it’s not venting effectively.
Don’t even think about getting a dryer “heat reclamation” device. These pump gallons of humid hot air into your home, greatly increasing your odds of mold and roof rot.
Turn off humidifiers
If you have moisture problems and you use a humidifier, stop using the humidifier. Humidifiers can dump gallons of water into the air every day. Central humidifiers are especially bad because they use the homes leaky ductwork to spread the moisture.
If you absolutely must use a humidifier, use it only in the room where you sleep and turn it off when you’re not using it.
Keep in mind that the primary reason you need a humidifier is because your house is leaking in cold, dry air. The need for a humidifier is a clear sign that your house is inefficient and you could save a lot of money and be much more comfortable by tightening your home. I know – when I moved into my home, our lips and skin cracked, our noses bled and we were really uncomfortable. We had to use humidifier round the clock to be comfortable. After replacing our old windows and air sealing the house, we haven’t had to use the humidifiers once.
Ventilate when cooking
If you cook on the stove a lot, make sure you use an outdoor venting range hood. This is especially important if you have a gas stove or oven because these generate carbon monoxide and water vapor.
Conservatively water plants
Much of that water you use to water plants ends up inside the house.
Avoid “ventless” gas fireplaces
These should be outlawed. Ventless gas fireplaces generate tons of water vapor and, if not running cleanly, carbon monoxide, which can kill you. No matter what Bob Villa might say, these units should never be installed or used. It’s physics. A byproduct of combustion is water and carbon dioxide. And if the combustion isn’t *perfect*, you also get carbon monoxide.
Look for hidden water sources
Basements and crawlspaces
If you have a crawl space or damp basement, this could lead to huge amounts of moisture entering your home. Many articles have been written on this topic. For now, be aware of this and check your basement and deal with any moisture problems under the house. If you don’t there’s a good chance you’ll end up with attic/roof moisture problems.
Indoor ponds and fountains
Self explanatory.
Any other place water is used in the house
Step 2: Air seal the ceiling between the living space and the insulated attic/cathedral ceiling
I’ll save myself 1000 words – refer to this excellent diagram and ensure that your home has an airtight seal between the living space and the attic or the inside of your cathedral ceiling.
Avoid traditional recessed light fixtures!
 If you’re considering (or already have) recessed light fixtures, use air tight LED fixtures. The manufacturers completely lie when they label traditional fixtures as ICAT (insulation contact, air tight). I dare you – turn one of these fixtures upside down and fill them with water. Water will rush through all the holes in the fixture. Now picture your ceiling during the winter – air flows right through the fixture, carrying moisture up into your attic or ceiling. You are virtually guaranteed roof rot if you have a ceiling filled with recessed lights.
Don’t believe me? remember this photo from earlier? This builder swore up and down that he did everything right and the roof was still rotting. Why? Because he installed about 20 of these fixtures in the ceiling. You can’t argue with physics.
Fortunately, you can cut your energy usage in quarter, never have to change a bulb again, and eliminate the moisture infiltration problem by using flush-mount LED lights like these. You can also retrofit existing recessed light fixtures using these types of lights.
One word of advice – use a thin bead of caulk around the lip of the fixture to seal it to your ceiling. This is the only way to ensure an air-tight seal. Yes, it will be a pain in the butt to remove later, but these things are rated to last 36,000 hours. That’s 4-years of continuous use so 10-20 years in real use. LEDs often last much longer.
Seal all duct registers and especially bath fans
I have never seen a bath fan that’s properly air sealed, and they’re in the most critical location in the house. The installer will cut a hole about 1″ larger than the fan then cover up this big gap with the fan’s grill. Out of sight, out of mind.
All that humid air from your showers will go right up through these gaps and into your attic. This is the place you should start with your air sealing because it’s so easy and so effective.
After that, if you have heating/air conditioning vents in the ceiling between the living space and attic, remove the grills (called “registers” in industry lingo for some reason). These are installed the same way as bath fans. Big holes. Sloppy installation. You can use spray foam or caulk to seal the gaps. Or, use this incredible tape, called “foil mastic.” Clean off the sheet metal of the duct “boot” (that’s the metal thing the duct is attached to that screws to your ceiling). And use this tape to seal all around the perimeter where the boot attaches to the ceiling. Be careful to measure it so that it doesn’t show outside the register before sticking it to the ceiling because once it sticks, it’s on there for good!
Cover the attic hatch
 Attic hatches are responsible for a huge amount of energy loss and the associated moisture damage in attics. Make sure yours is air-tight (which is almost none except for these Rainbow attic stairs). These are the best I’ve ever seen and worth the money.
For the other 99% of you who already have attic stairs, install the ESS Energy attic stair hatch. This thing is awesome. Or, you can build your own out of foam-board. But seriously, the ESS Energy system is so much better than the other solutions out there that’s it’s worth it.
Get a blower door test before and after air sealing
The best way to go about air sealing is to have an energy auditor come and do an infrared inspection with blower door test before and after the project. You do it before the air sealing to locate the air leaks so you can prioritize the work. You do it after to ensure the work was done right!
When I did these inspections on a daily basis, I found that the combination of blower door test and infrared thermography was the only reliable way of finding the problems. Some folks will say they can find all the problems without the right tools, but, frankly, they’re misguided. I don’t care if you’ve been doing this for 50 years, your eyes are not going to find hidden problems.
Let me give you an example. Suppose you go to the doctor. You’re not feeling well. Strange pains in your abdomen. If the doctor prodded you a couple times, told you “it’s nothing, you’ve got gas” then said “I don’t need to use a newfangled MRI machine” – would you trust your life to them?
For a few hundred bucks, are you going to trust someone’s eyes or a proven tool?
Ready? Insulate your attic!
After you’ve reduced humidity problems in your home, then air-sealed the ceiling between the living space and the attic/cathedral ceiling, then you can insulate.
How should you insulate? Honestly, if you’ve done your prep work properly, you can use cellulose, spray foam, fiberglass, recycled denim or horse hair and your home will be relatively well insulated and energy efficient.
Obviously there are differences, but it should be clear that the prep work for insulation is key. Even the best insulation product can have issues if you don’t air seal and reduce humidity.
Some guidelines for insulation in colder climates
I have to start by saying this is all for winter insulation. Hot, humid climates have their own rules which are often reversed from cold climates.
Moisture barriers go towards the warm, inside of the house
In winter, the moisture barrier should be the first thing beyond the ceiling material. You absolutely don’t want to trap moisture on the cold side of the insulation.
Refer to your local building code for the use of moisture barriers. Many jurisdictions are changing their approach to moisture barriers.
Install insulation
Like I said, the specific insulation product usually doesn’t matter if everything to this point has been done right. The main differences between products are price, R-value per inch of thickness and convenience of use. These can be significant differences and you have to determine what works best for your own home.
Some things they should tell you about insulation but often don’t
- Blown in products are messy. Cellulose or fiberglass blown in to an attic basically renders the attic useless for other purposes. If you think you’ll never go into the attic, then great, blow in a couple feet of cellulose and be done with it. But if you have heating/cooling equipment up there or you want to use the storage space, you will hate the decision. Trust me. I want to kill my insulation installer for blowing cellulose in my attic after I told them I didn’t want it.
- If you’re doing it yourself, consider recycled denim like UltraTouch. This insulation doesn’t leave you itchy. It’s dense and fits into the cavities securely. I did my parent’s attic with it and it was wonderful to work with. The downside is that it’s pricey and hard to cut. But it’s really good stuff. Well worth looking into for a DIY project.
-

Rotten roof deck caused by moisture trapped by insulation
If you’re installing insulation directly under the roof, like in a cathedral ceiling or attic ceiling, make sure to leave about a 2″ gap between the insulation and the roof sheathing. If you don’t, there’s a good chance your roof will end up like this.
- If you install insulation directly under the roof, you have to air seal underneath of it, like with an airtight sealing. In the attic, you can install rigid foam board to the rafters and essentially create a cathedral ceiling in there.
- There are different types of spray foam. Open cell, which is like what couch cushions are made of, and closed cell, which is rock-hard. They have different characteristics that you need to research in order to make a good decision about their use.
- You do not want to install insulation on the attic floor and under the roof. This is a case of “more is worse.” The insulation on the attic floor will make the attic cold, and the insulation above can trap the moisture in the attic, leading to moisture problems if the attic space isn’t ventilated. But if you ventilate the attic, then the insulation under the roof is doing nothing. Don’t do it! Choose one location – either the floor or the ceiling and insulate it properly.
- If you insulate and air seal the attic floor, then ventilate the main attic space according to code. No matter how good your air sealing, moisture will enter the attic from the living space. If this is trapped in the cold attic, you can rot your roof. So the attic has to be ventilated. Personally, I’ve seen gable vents work fine in homes but it’s all the rage to use soffit and ridge vents. Whatever. Just ventilate the space well to flush out moisture.
- If you insulate under the roof, be sure to air seal under the insulation just as well as you would the ceiling of your home. The attic becomes part of the living space when you insulate under the roof. Treat it as such. Fail to do so? See photo above.
Ok, that’s enough. My fingers are tired from typing all morning. If you’ve read half of this and gotten this far, you should have most of the information you need to create a comfortable, efficient home that will last for decades.