LED Recessed Light Retrofits – Pros and cons

A reader, Adam, recently asked about the pros and cons of using LED retrofits vs. sealing recessed lights from the attic. It’s such a good question that I had to write up a quick post detailing my thoughts on this important topic.

I’ll start by saying that I have upgraded all of the recessed lights in my home with LED retrofits. This has numerous benefits over attic sealing. Prior to good LED retrofits being available, I had constructed airtight/fireproof boxes installed from the attic, so I can comment on both methods from first-hand experience.

The retrofits were easy to do, taking maybe 10 minutes each, at most. These days, high quality retrofits are inexpensive, typically less than $30.

Benefits:

  • Totally air-tight when installed properly with a good gasket
  • Energy efficient – depending on your electric cost, the light will pay for itself, especially if it’s in a high-use location, like the kitchen. Usually less than a year.
  • Energy efficient part 2 – you can insulate the attic properly above the fixtures. LEDs generate much less heat than incandescents. Plus, you won’t lose the heat from air escaping through the housing.
  • Long lasting – quality LEDs are rated to last about 2-4 years running continuously. Compare this with an incandescent which has a life only one-tenth as long. This is much more convenient (less time on the ladder is safer too!). For most uses, that means you’ll never have to replace a bulb.
  • The light quality of “good” LEDs is very natural if you buy high CRI (color rendering index) fixtures. This is very personal, so compare the light from different fixtures to find one you really like. I brought home several, installed them and then my wife and I could see how they looked in our own homes which is much different than the display case in the store. You can usually return the ones you don’t like, so it’s worth trying a few.
  • The retrofit itself is quite simple usually. Most wire into your existing fixture using a screw in connector that replaces the existing bulb.
  • Air/moisture leakage through recessed lights are one of the primary sources for mold and rotten roofs. By installing air-tight LED fixtures, you will potentially prevent a very expensive roof replacement and mold remediation.

Challenges with retrofitting from the attic:

A look down into the soffit area above the grill

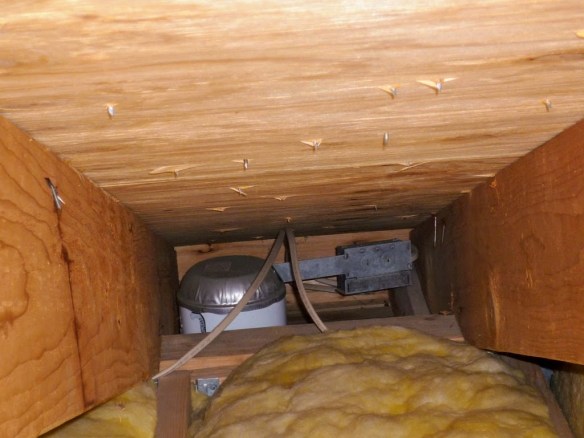
A picture is worth a thousand words…

  • Working in attics is not fun. It’s hot, dusty and access is often difficult. This makes contractors less likely to do a good job because they’ll be anxious to work quickly and get out of there.
  • It can be difficult to mount the air-tight enclosure in the attic given the construction of a typical recessed light fixture. This often leads to compromises that leave gaps, defeating the purpose of an air-tight enclosure.
  • Incandescent lights generate a lot of heat. Some older fixtures aren’t rated for enclosure. Usually this isn’t a problem however.
  • Covering the fixture with a housing can make insulation challenging. Most contractors are afraid of insulating around fixtures, leading to compromised insulation.

Other considerations:

  • Some LED lights are not-dimmable – so make sure to buy the right type if you need them to dim.
  • The convenience factor of not having to replace bulbs in high ceilings is worth a lot.
  • Make sure the chosen fixture is the right size (4″, 5″ or 6″) for your retrofit. There are also different mounting styles that can affect compatibility.
  • Avoid off brands or those without a good warranty. The only trouble I’ve had with LED bulbs/retrofits are with cheap “knock-off” type. My favorites have been manufactured by CREE, which were the pioneers in LED lighting. Phillips also makes quality products.
  • You still have to be careful in sealing the retrofits in order to make them air-tight. They need to have a good gasket and be firmly seated to the ceiling.
  • The thermal image, below, shows a huge amount of air leakage around a so-called air-tight recessed light fixture. As with all things in home construction, installation is key!
  • For best air-sealing, I have used foil-tape to seal the holes inside the existing fixture. Some people claim you need air flow through the fixture for cooling but the fact that these fixtures are built to be air-tight negates this argument.
Does this look like an air-tight recessed light?

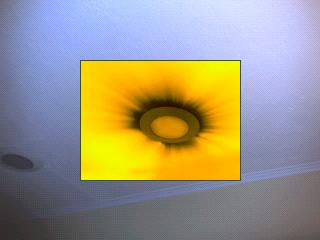
Air-tight? Not unless installed right!

Finally! Time to Buy Small, Round Dimmable LED Bulbs

This slideshow requires JavaScript.

It’s about time.

Well, actually, it’s about energy conservation, saving money and light quality.

For years, I’ve been looking for a frosted, round candelabra base (G16) dimmable LED bulb that I can use in my high-use fixtures. And yesterday, I found what I’ve been looking for in my local hardware store.

Continue reading

Philips SlimStyle Dimmable LED Bulb Mini-Review

Philips 60w Dimmable LED bulb

Philips 60w Dimmable LED bulb

Woohoo, a high-quality, $10 (now $9 at Amazon), dimmable LED bulb!

Philips has been a leader in LED lighting for some time, and their new SlimStyle bulb securely places them at the front of the pack.

While there are other, sexier dimmable LED bulbs, the SlimStyle has the best price/performance that I’ve seen. If you run the numbers, for a high-usage fixture (I define that as 8-hours a day) then you’ll find that this bulb pays for itself in about half a year in saved electricity costs. In my book, that makes it a “no-brainer.” It’s inexpensive, durable, casts a lot of pleasing light and is the first LED bulb that I’d call *cute* 🙂  Really, just look at it. What’s not to like? Continue reading

G7 Power 40W Retro Light Bulb – LED lighting has never been so beautiful


Conventional incandescent (front) and G7 Retro (back)

Conventional incandescent (front) and G7 Retro (back)

The new A19 style bulb from G7 power may change the way you see LED lighting. No more big heat-sink fins, just a classic Edison bulb style without the power penalty.

With just 3.6 Watts, the bulb casts 400 Lumens, the same as a conventional (now phased out by law in the United States) 40W bulb. After some visual comparisons, I can’t see why anyone would need to use an old incandescent bulb (other than price). The bulb comes on instantly and glows with the familiar color that we’ve come to expect from incandescents. Its efficiency is amazing, at 138 Lumens per watt – more than twice as efficient as most compact fluorescent bulbs and greater than 10x more efficient than an incandescent.

A quick comment about cost. If the bulb gets high use, say 8 hours per day, it will consume just 10.51 kWh per year. Compare this with 116.80 kWh per year for the 40W bulb it replaces. At an electricity cost of $0.15/kWh, you save $15.94 in electricity per year – more than the $11.95 cost of the bulb. So this would be a great bulb for high-use fixtures around the house or places where the aesthetics and light quality are important.

Keep in mind that this bulb is NOT dimmable, so it’s not a complete replacement for the incandescent.

Check out G7’s website for more info.


Initial impressions of the CREE 60w Warm White LED Bulb

Having received the just released CREE 60w warm white LED bulb, I wanted to get you my impressions ASAP since many of you are already asking about this ground-breaking bulb.

The vital stats:

  • Manufacturer: CREE
  • Cost: 6-pack, $74.82 at Homedepot.com = $12.47 each.
  • Brightness: 60w equivalent – 800 lm
  • Consumption: 9.5 Watts
  • Efficiency: 84.2 lm/W
  • Life: 25,000 hours
  • Usage: Indoor/outdoor
  • Dimmable!
  • Assembled in the USA
  • Lead free / Mercury free

For comparison, an incandescent bulb has:

  • Cost: 4-pack, $6.00 on Amazon (Philips name-brand bulb). Sylvania are close to $0.50/bulb.
  • Brightness: 860 lm
  • Consumption: 60 Watts
  • Efficiency: 14.3 lm/W
  • Life: rated 1,000 hours

Operational costs?

Based on simple lifetime cost, the LED lasts 25x as long as the rated life of the incandescent and is roughly 25x the cost of the inexpensive Sylvania bulbs, so by that measure, these are the “same cost.” However, that doesn’t figure in inconvenience of having to replace the incandescent 25 times, going to the store, or paying for the electricity! It doesn’t take a physicist to see that the CREE LED bulb is the big winner.

For the 25,000 life of the bulb, the CREE saves 1262 kWh or electricity. That’s a LOT of energy savings! How much? That’s about a month of your home’s entire electric usage. Compare that with your electric bill and you’ll immediately estimate your cost savings. For me, this electricity costs about $200. 

Subjective comparison

The bulb feels different from any other bulb. It must have some sort of rubberized coating on the translucent housing. It almost sticks to your hands. In fact, I felt the urge to wash my hands after touching it. Very strange. The positive thing about this is that you’re not going to drop this bulb., unlike normal glass, which is slippery.

I immediately replace the bulb in my desk lamp, which is an old CFL. That works fine once it warms up, but it always seems to be a dim yellow for the first 10 minutes, by which point, I’m about to leave the room. Note however that I strongly recommend that you use this in fixtures with good reflectors on the back surfaces. Otherwise, you’ll waste a lot of light that doesn’t reflect off the back of the fixture. I learned this the hard way in my downlights (recessed light fixtures). Standard incandescent flood lights have internal mirrored surfaces to project the light forward. These LED lights are omni-directional, so you’ll waste a lot of their light output if they’re used in fixtures without good reflectors.

The CREE, being an LED light, is essentially instant-on to full brightness – very nice.

As for the color, it does appear to be a “warm white.” If you don’t tell someone that it’s an LED, they probably wouldn’t know, which is exactly the effect they’re looking for. In fact, combined with the shape of the bulb, I’m guessing that the only way one would know that this isn’t a regular bulb is when you dim it. Incandescent bulbs grow very warm at lower dimmer settings, whereas LEDs maintain their color temperature throughout the range or brightness.

The next replacement was in one of the downlights in my bathroom. These are particularly important because you want to maintain a neutral skin-tone. Nobody wants to look in the mirror and see a strange skin tone! In this case, the yellowish cast is definitely noticeable compared to the incandescent. I’m not sure why this is, but it’s quite obvious.

I then replaced the LED in my closet, which was a bright blue (my wife says it looks like s dentist’s office or something). The change in color was very apparent – definitely yellowy. I’m not sure it I like it or not. It’s definitely “warmer” but perhaps not as natural. I need to try some of the whiter versions of the CREE bulb which is supposed to be off-white. Here’s a comparison photo:

Which is which?

Which is which?

The container is very white while the counter tiles are almond. The photo was taken using the camera with manual white balance that is tuned for incandescent bulbs, so it will make the incandescent image look as white as can be. If you used a spectrophotometer, you’d get a more accurate image. However, it’s not how you’d perceive the colors.

Looking at the color spectrum, I found what would be expected, the light from the LED bulb consists of three distinct peaks – red, green and blue, whereas the incandescent is a smooth spectrum. In theory, you should be able to come up with a close color match using the three primaries, but contrary to popular opinion, you will not be able to perfectly match the color produced by a continuous spectrum source.

Perceptually, these images are a fairly close match to what I was seeing. Pretty good colors but not exactly what I’m used to. Your mileage may vary!

Here’s a striking comparison between the LED and the CFL using my desk lamp. Again, I kept the white balance on the camera set to “incandescent”, meaning a pure white would match an incandescent (which really isn’t white, but it’s what we perceive as white in our ordinary indoor experience).

Using the same camera settings, the LED is much closer to an incandescent

Using the same camera settings, the LED is much closer to an incandescent

Keep in mind that perception changes our reality. The CFL doesn’t really look that yellow, because our brain tries to color balance things. However, the camera is good at showing things without this bias. The main take-home message is that the LED bulb is a vastly better match for what we normally think of as household lighting.

As you try out different bulbs, let us know what you think. The CREE, at only around $10 has broken new ground for quality and efficiency.  It’s well worth a try.

High Efficiency Outdoor and Landscape Lighting

I’m personally not a big fan of landscape lighting, because 99% of the time you don’t need it at all. As they say in the business: “the most efficient light is the light that you don’t use.” But for many, landscape lighting is a necessity. In this post, I’ll cover several ways you can reduce the energy used for your outdoor lighting. How does a 98% saving sound? Unbelievable? Read on! Continue reading

LED Christmas Lights

As you shop this holiday season, you’re probably seeing a lot more LED Christmas lights. Their colors are more vibrant and they’re vastly more energy efficient than conventional incandescent Christmas lights. But do they pay off?

Let me ask you something – when you buy a string of lights for decorating, are you thinking “what is the cost-benefit ratio of these lights?” Or, are you thinking “will these look good in my house?” Me personally? I’m thinking that I hope they last for more than one season and I don’t spend next Christmas searching all day for that one burned out bulb! Few things put me in a foul mood faster during the holiday season than having to waste time. I’ve purchased a variety of LED light sets. Some are fantastic, while others are too faint. But all have been reliable and none have burned out. This alone make’s it worth the $10-$20 per string.

What about energy savings?

Continue reading

The Dangers of Compact Fluorescent Bulbs

Photo credit: flickr user Mulad

There’s a lot of debate about the danger of CFL’s due to the mercury they contain. But how much is it really? And what happens when the bulb breaks?

A recent study, reported in Home Energy Magazine, may surprise you. The study involved breaking new CFL bulbs from a variety of manufacturers and measuring how much mercury was released. To put it into context, they compared the amounts to eating a can of tuna fish – known to contain some mercury but also something most of us do regularly.

In order to really test for the worst case scenario, they tried to do things to make the conditions as bad as possible. Then they “sniffed” all the air with their measurements – the equivalent of sticking your nose right above the broken bulb and inhaling repeatedly as hard as possible. I mean, they really went out of their way to get the highest numbers possible! They noted:

 “In short, everything possible was done to elevate the air concentration of mercury in the room. Even with all this, the one-hour average air concentration of mercury was 21,262 ng/m3 at 1 foot above the floor and 16,814 ng/m3 at 5 feet above the floor, well below the OSHA PEL of 100,000 ng/m3″

What does this mean? Those numbers sound really high, right?

Well, not so fast. It turns out that “a 6 oz portion of albacore tuna is about 63,344 ng. A 2 oz portion would contain about 21,448 ng of methylmercury.” So eating a small portion of tuna exposes you to more mercury than a worst case scenario with the broken bulb.

I should note, there is a difference between eating and inhaling mercury, and since nobody snorts tuna fish, the results aren’t exactly comparable. So keep that in mind. However, based on this study, I feel a lot better that I’m not putting my health at risk by using CFLs.

The article is short and practical, and I highly recommend anybody still worried about the risks of CFLs to read it.

Ted’s Top Tips to Help You Beat the Heat!

Record temperatures are creating uncomfortable conditions all over. Here in Pennsylvania, we’re expecting near 100F temperatures for much of this week, while Chicago just suffered through a heat index of 115F!

Along with high temperatures come big utility bills because of all the air conditioner usage. In this post, I’ll give you some tips for how you can “beat the heat” without breaking the bank!

Why Things Get Hot

If you’ve read any of my posts, you know that I like explaining things because I want you to understand WHY things occur. Once you know why, you can figure out solutions yourself.

Why do we use umbrellas to block the Sun? We all know that it’s cooler in the shade because the sun radiates heat. So if you can block the solar radiation, you can block a lot of the heat that it brings.

Even if you’re in the shade, it can get darned hot! If you’re sitting in your house, you’re being shaded by the roof – no direct sun is hitting you yet you’re still hot. Why? Because there’s still a lot of heat coming in – from the hot roof, the walls, sun shining through the windows and hot air entering the house.

There are other things that heat your house in the summer. Some obvious, some unexpected. You probably know that conventional light bulbs put out a lot of heat. In fact, each light bulb acts like a little space heater. But did you know that every appliance in your home, from your television to your refrigerator, is also pumping heat into the house 24-hours a day? And your water heater, especially if you have an oil boiler for your hot water – those throw off a ton of heat!

Quick recap -houses get hot in the summer because:

  • Solar radiation heats objects in direct sunlight, like your roof
  • Hot air carries heat directly into your house
  • Hot air and solar radiation heat your walls
  • Solar radiation enters through windows and skylights
  • Appliances and lights produce waste heat that enters your home

Beat the Heat!

Now that you know what causes your house to get hot, let’s see what you can do about it. I’ll start with the easy ones and work up to ideas that require more changes or greater investments.

  1. Wear light clothes. Ok, this one is so obvious that I’m embarrassed to write it! But simple things like shorts, a lightweight shirt and no socks make a big difference to your comfort level.
  2. Drink ice water or other no-calorie drinks. Cold drinks help reduce your body core temperature, that’s good. But don’t drink beer or soda or eat ice-cream and expect to stay cold. Anything with calories adds energy to your body, and that energy makes you less comfortable in hot weather.
  3. Use fans to circulate air around you, but only when you’re in the room. Fans cool you by speeding the evaporation of sweat and by carrying heat away from your body. But when you leave the room, turn off the fans or you’ll be wasting electricity AND adding heat to the air because the fan motor gets hot. Remember – fans do not cool the air!
  4. Turn up the temperature on your air conditioner. A slight increase in the temperature setting of your AC results in a significant reduction in the amount it runs. For example, raising the setting from 72 to 76 can reduce the energy use by 25%. Use a fan and turn up the temperature and you’ll see the savings on your next utility bill.
  5. Raise the temperature on your AC when you’re not at home. There’s a lot of debate on this one, but let me put it to rest – you save considerable energy by turning up your AC when you’re not at home. Yes, you have to crank the AC when you get home, but there is definitely a savings – you will save much more energy doing this than leaving the AC at a constant temperature all the time.
  6. Open the windows at night only if it’s cool and dry. Natural cooling at night is a great way to cool the house only when the air is dry. A big use of air conditioning is to remove moisture from the air so if you open your windows at night or in the morning when it’s really humid out, you’re filling your home with water. After that, your air conditioner has to work overtime to remove that moisture. So resist the temptation to open up the house when the humidity is high.
  7. Turn off lights when you’re not in the room. This is always good advice, but it makes even more sense when it’s hot out. Remember, those lights are little space heaters. The longer they burn, the more your air conditioner has to run to remove the heat that the lights put out.
  8. Replace lights with high-efficiency bulbs. This requires a little investment but it pays off year round. Compact fluorescent and LED bulbs are much more efficient than conventional bulbs mostly because they convert more of the electricity into light. I’ve written more than enough about the direct energy savings from these bulbs. Stop making excuses and replace those bulbs!
  9. Install a new fridge. And recycle your old refrigerator. The old energy hogs throw off an amazing amount of heat. A new, super-efficient fridge can pay for itself in a few years and it will heat your house less.
  10. Add insulation to your attic. If you don’t have at least a foot of insulation in your attic, you’re probably under-insulated. If you have a house from before the 1980’s, chances are, you only have a few inches of insulation. Going from 3 inches to the recommended 14″ of insulation (maybe R-9 to R-42) will reduce the amount of heat moving from your attic into your home by about 80%. A good insulation job is something you’ll appreciate year round.
  11. Shade your windows. Remember, a big reason things get hot is because of sunlight. Ideally, you don’t want direct sunlight entering the windows. The best way is by using trees or bushes to shade the windows. If that’s not possible, exterior awnings do a great job, though many people object to the aesthetics. If that’s you, then get interior cellular shades to block the direct light.
  12. Get windows with heat reflective coatings.  In recent years, window coatings have gotten truly amazing. A good window can block 90% of the heat from entering from the sunlight. This also protects your carpets from damaging UV radiation. An added benefit is that these same windows will hold in more heat during the winter and they’ll be less drafty. So replacing old, leaky, single-glazed windows with tight, low-e, double or triple-glazed windows can make a big difference in your comfort year round.
  13. Install a white-roof. Depending on your climate and your current insulation, this may or may not make sense. If you have lots of insulation, than the amount of heat coming in from your roof can make very little difference. But if you’re changing your roof anyway, get a reflective roof. This can substantially reduce attic temperatures and therefore the heat entering your home.
  14. Install a more efficient air conditioner. New air conditioning is usually my last recommendation. You’ll spend thousands of dollars and depending on where you live, you’ll may only use it a few months per year. However, if you have an old unit, it’s probably operating at less than SEER 10, so switching to a new SEER 18 unit can cut your AC bills nearly in half.