What Temperature Should I Set the Thermostat to When Away for the Winter?

I recently received this question on Quora and decided to share the answer with readers there as well as on TedsTips. I hope this will save some of you from heartbreak after your winter vacation!

A primary consideration in cold climates is pipes freezing. It is very important to realize that pipes can freeze even if the home temperature is above freezing due to the locations of the pipes. I once owned a townhouse where the pipes would freeze when the outside temperatures dipped into the single digits outside, even though we were warm inside the house. How? The pipes ran up through an inside wall, across the ceiling and over to an outside wall spigot. The inside wall, at the top, opened to the cold attic, so that cold air would get into the wall cavity and freeze the pipes. This was fixed by air sealing the top of that wall cavity, but required considerable detective work to figure out. The pipes running through the outer wall down to the spigot would freeze near the spigot where the pipes were exposed to cold temperature, so this run had to be isolated from the rest of the house plumbing and drained during the winter.

These are two examples, that show potential issues that are made worse by turning down the temperature while you are away. Imagine the situation where the pipes don’t freeze when the house is occupied and the walls are warm enough to keep the pipes from freezing. Now, imagine reducing the indoor temperature, maybe only a few degrees, but enough that the cold from the outside overwhelms the meager heat coming from the house that is able to reach the pipes. This has bitten many a homeowner during winter absences.

Unfortunately, there is really no way of knowing if this will happen until it happens. This is why it is critical that you turn off the main water valve for the water supply to your spigots in your house when you travel*. The pipes may still burst, but at least your house won’t flood. When you return after winter and turn the water back on, you’ll know quickly that there’s a leak and can turn off the water and fix the leak before catastrophic damage is done. This is no exaggeration – I was called into a home that was literally FILLED with mold and had to be gutted. A pipe had burst and the owner returned after a month to find the house completely flooded.

*I was reminded (see comment below article) that you MUST NOT turn off the make-up water supply if you have a boiler for heating your home. This is very important. Boilers need available water to maintain system pressure in your radiators etc. Without make-up water, the pressure in the system can drop and the system will stop functioning.

If you plan on leaving your home for an extended period, it is always a good idea to have your HVAC company give the heating system a once-over to ensure that it is in good working order. While there, they can advise you on which water valve you can safely turn off and which you should not touch. It would be advisable to label all the valves for future reference.

Flooding is the most damaging effect, but there’s another, more insidious issue that can arise during winter house shutdowns – condensation damage and mold.

Water and Ice on a Cold Window

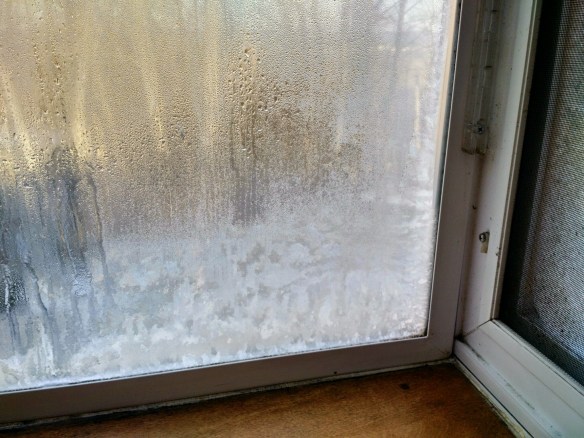
Condensation can lead to mold and wood rot

In order to understand this, I have to touch on the physics of condensation. Condensation is the conversion of water vapor to liquid water that occurs at or below what is called the “dew point.” At normal temperatures (say 70F), condensation rarely occurs during the winter because the home humidity level is modest and most of the inside of the home is above the dew point. However, even with typical indoor humidity levels, you can experience condensation on windows, because windows get much colder than the insulated walls of the house. You might have noticed this if you have curtains or insulating blinds. These help keep your room warmer but allow the windows to get even colder because they intentionally reduce the windows sapping heat from the room. When you open the curtains, you might find the windows soaking wet from all the condensation. Worse, the wood around the window, especially at the bottom edge, might be saturated with water.

Under normal circumstances, you would see this in the morning and could dry off the wood and allow it to warm up when you open the curtains. But when you are away, even if you don’t turn down the thermostat, the water will remain and can get worse every day. Over time, this will likely lead to mold growth and if allowed long enough will rot out the wood. For this reason, I highly recommend that people leave their curtains and insulating shades “UP” or “OPEN” when they are away for extended periods. You want to minimize the chance of condensation buildup and the associated potential for mold and wood rot.

Let’s continue this thought experiment. If you turn down the thermostat enough, the inner surfaces of your house (walls etc.) can get to a temperature below the dew point and, just like those windows, the water vapor in the air can condense on those surfaces. Many people have made this mistake and come home to a horrible, moldy mess! For this reason, it is extremely important to do two things:

1 – do not turn down the heat excessively. It’s impossible to tell exactly what temperature is too low, but in most climates, people find 55F-60F is safest.

2 – make sure you don’t add any moisture to the air while you are gone. This can be disastrous. For example, many homes have central humidifiers built right into the heaters. If you leave this one it raises the humidity level inside the house every time the furnace runs, likely leading to moisture problems. Turn off all humidifiers before you leave!

Even if you don’t have humidifiers, natural ground moisture can seep into the house through the basement, crawlspaces, etc. This is especially common in homes with dirt floors underneath. Water vapor rises up into the house, driving up the humidity. If you live in such a home, it is really important that you monitor the humidity levels in the home to ensure that they are not too high. During winter, indoor humidity levels will naturally be low, typically less than 50% relative humidity. Humidity levels above 70% are considered too high as they promote mold growth. Get yourself a humidity monitor (they’re cheap on Amazon) and see what humidity levels are. Or better yet, get an Internet smart thermostat.

Smart Thermostat with Relative Humidity

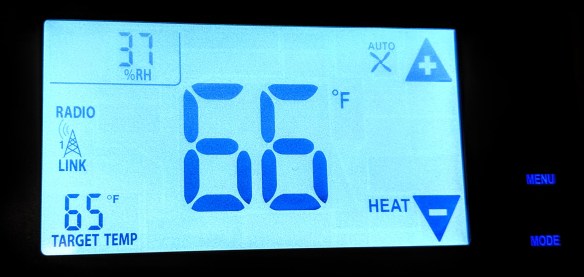
Get an Internet connected thermostat that monitors temperature and humidity

These let you to monitor indoor temperature and humidity levels while you are gone. These are affordable nowadays, and can give you tremendous peace of mind. A quick daily check on temperature and humidity gives you a read on the health of your home. It’s not a guarantee, as you still might have condensation problems, but at least you can be sure that the general climate inside your home is reasonable. It will also tell you that your heating system is working. If the temperature suddenly drops to 45 even though your thermostat is set to 55, you know there’s a problem and can call in help.

Have a wonderful winter. Hopefully you will avoid the main pitfalls that have hit too many other people. A few easy steps can greatly improve your odds of coming back to a healthy home!

Why Does My House Smell?

StinkyFace

Yes, that’s your illustrious author making the “stink face”

People often ask: “why does my house smell?” Often, this is during the winter because your house is sealed up for months, with little fresh air. In fact, with tight, energy efficient homes, this has become even more of an issue. It’s one of the reasons that there’s been a backlash against tight houses.

#1 – your house might not be adequately ventilated

First, let me address the energy efficient house issue. The problem is, many builders and architects don’t understand that a house is a complex system. You can’t just air-seal the house and have a healthy house. That’s why building best-practices call for a certain amount of fresh air circulation. So if you live in a tight house, you want to ensure you have adequate fresh air or your house will get stale and smell. If you don’t know about HRV’s and ERV’s (heat recovery ventilators and energy recovery ventilators) read this short post. Every modern home should have one of these. Once you’ve lived with one, you’ll wonder how you managed without it.

#2 – there might be a dead mouse/animal somewhere Continue reading

Heating Systems 101 – Learning the Lingo

She Blinded Me With Science!

One of the toughest things about researching a new heating system is learning the tech talk. Your HVAC company will throw out all sorts of terminology assuming that you understand what they’re talking about. Some might even be happy that you *don’t* understand so they can confuse you and sound like experts. Well, no more!

This post covers the most common terms that you’re likely to run across. I’m sure I’ll miss some or confuse you, so please post questions if there’s anything you’d like clarified.

Continue reading

GE GeoSpring Heat Pump Water Heater

GEH50DEEDSR _ GeoSpring™ hybrid electric water heater _ GE Appliances

Intro

In July 2014, I purchased this GE GeoSpring heat pump water heater to replace my existing all-electric water that had sprung a leak. Admittdely, it was an impulse buy because Lowes was having a sale on them – probably to get rid of unwanted inventory because these have horrible reviews!

So why did I buy it? Because it was only a few hundred dollars more than a conventional electric water heater and I’d been wanting to get an integrated HPWH after my previous add-on HPWH died after just a year. Plus, based on the negative reviews, I felt that the people having problems were using earlier versions of the heater. So I’m crossing my fingers and hoping that it has a long, happy life.

Almost everything written in this article applies to all heat-pump water heaters. I’ll put the GE specific notes at the end.

What is a heat-pump water heater?

You may not know it but your refrigerator and air conditioner are examples of heat pumps. Through a process of compression, condensation and evaporation, they move heat from one place to another. In your refrigerator, that humming you hear when it runs is the compressor. The inside of the fridge is cold because the “heat” in the fridge is moved to the outside of the insulated box and blown into your kitchen. An air conditioner works exactly the same way – it cools the air inside the house and expels the heat outside.

The HPWH does the same thing except it uses the heat to warm the water in the tank. And the cold? If you feel the output behind the heater, you’ll see that the cold gets blown into the room. Heat the water, chill the room. Keep this in mind, we’ll come back to that later.

Why does a heat-pump water heater save energy?

Continue reading

Insulating Basement Crawl Spaces

Spray foam on crawlspace walls

Crawlspaces – those nasty, damp, moldy spaces under your home that you dread entering. They’re one of the least understood parts of a home and the source of countless problems. In this post, I’ll review some of the worst problems and how to avoid them.

Crawlspaces often have two big issues:

  1. Water / moisture – leading to mold and wood rot
  2. Cold / drafty – leading to uncomfortable conditions and wasted energy

Continue reading

Swimming Pools: Save Energy While Enjoying the Summer Heat

Is there an Energy Hog in your pool?


If you have a swimming pool, you probably hate to see your utility bills during the summer. Chances are, you’ve attributed the high bills to your air conditioner. But pools and their associated pumping equipment might be responsible for at least as much energy use as that big central air conditioner!

Why does the pool use so much electricity and is there anything you can do about it?

Pumping water takes a lot of energy. Just think about the last time you took a swim. It takes all your energy to swim the length of the pool, while you could walk this distance without difficulty. In the same way, moving water, because of its weight and resistance to flow, requires a lot of energy.

So if moving water naturally takes energy, how can you reduce the consumption?

Without getting too technical, moving a gallon of water through pipes takes much less energy if it is moved slowly than quickly because of water turbulence. Just knowing this allows you to dramatically reduce your pool pump’s energy use.

Unfortunately, most pools are designed with vastly oversized pool pumps. For example, my pool had a 1.5 horsepower (HP) pump. This is useful for backwashing the filter, but for general filtering, using such a huge pump results in less efficient filtering and much more energy consumption. Worse, that 1.5 HP pump might pump less than twice as much water as a .5 HP pump due to the high turbulence caused by the larger pump.

You’ll find that running that 1.5 HP pump for 10 hours a day (fairly common for pool pumps) will add about 15 kilo-Watt-hours to your electric usage. For many households, that’s an increase of 30%-50% of the home’s total daily electric consumption! Over the course of a summer, that adds up to hundreds of dollars in increased electric bills.

For my pool, I installed a two speed pool pump that allows me to run at 3/8 HP for general filtering. The water flow is ample for filtering yet it uses about 1/8th the electricity as when it runs at 1.5 HP. The only time I turn it on ‘high’ is when I’m backwashing the filter. Other than that, it runs 12 hours per day at a few hundred Watts (a total of about 3.6 kWh/day). When I convert kWh/day savings (over 10 per day) to dollars, I’m saving more than $1.60/day which is about $150 per summer in saved electric bills.

If you’re building a new pool or replacing an old pump, installing a multi-speed or variable speed pump is a no brainer. At a cost of about $500 for a high end two-speed pump or $1000 for a variable speed, the savings will pay for the pump in a 3-6 years. About half that if you’re replacing an existing pump and would have to buy a new pump anyway. Pu another way, that’s like having an investment that pays 15%-30% dividends – in these economic times, you’re not going to find a better investment!

Your specific numbers will vary depending upon your electric rates. I pay a lot in eastern Pennsylvania, so any electric savings pays back quickly. If you’re in an area with cheap electricity, the payback won’t be as quick.

Even an Energy Auditor can get Bitten by an Energy Hog

I am embarrassed! I was recently bitten by an “energy hog” – an unwanted waster of energy hiding in the deepest recesses of my home.

He snuck in last week while I was using a lot of energy for opening/cleaning my pool. You see, at that time, I was running a big pool pump 24 hours a day, so naturally, my daily electrical usage increased. But I didn’t expect it to increase so much!

As part of the pool cleaning, you have to flush out a lot of water to clean the filter. Then, you have to add hundreds of gallons of water back into the pool. Since I’m on well water, that means running the well pump a lot! And if you’ve read my other articles, you know that pumps are notorious for using lots of energy. So the combination of the pool pump plus two well pumps adds up to big energy use. Continue reading

The Energy Geek Video: American Standard FloWise Shower Head

American Standard FloWise Shower Head

Generic low-flow shower head

I admit it, I don’t often get excited about water saving. In the past, you may have used those crappy little low-flow shower heads that seemed to spray a mist of water rather than a nice shower. Those things set back the entire industry for years.

Shower heads today are a different story. I recently read some great reviews on Amazon.com about the American Standard FloWise shower head. This convinced me to give it a shot.

I bought the FloWise for about $40 on Amazon. I’ve added it to my store now that I’ve played with it and know it’s a “Geek-worthy” product.

Rather than just re-type everything I spent time producing in video, I’ll just give you a summary:

FloWise shower head

  • Cost about $40
  • Works great. Low-flow at 1.5 GPM (gallons per minute). Full-flow at 2.0 GPM
  • Saves about 40% on your shower water usage
  • Depending on your water heating costs, it will pay for itself in two years or less. In my case, it’s under a year. If you have kids who take long showers, it will pay for itself in less than 6-months.
  • Caveat: if you have really long, thick hair, this might not be for you. But for most people, it will work great.

Follow-up: Usage Recomendations

Having now had the opportunity to use this more, I wanted to give some usage recommendations so that you get the most out of your hot-water saving shower head.

First, be aware that when you first turn on the shower, it’s going to take longer for the shower water to get warm because there’s less water moving through the pipes. If you’re moving from an old, non-water saver head to this one, you may think something is wrong because it takes so long.

Whenever you take a shower, the water has to get all the way from your water tank to your shower, so if your old shower had moved 4 GPM and this one move 1.5 GPM, it’s going to take almost three times as long for that water to arrive. This can be a bit frustrating and it will make you feel like it’s wasting water when in fact both will use exactly the same amount.

In order to minimize the wait, I suggest turning the water on full hot initially and setting the shower head to one of the turbo modes. This will do several things. First, the hot water will heat up the pipe faster because more hot water will be flowing through the pipe. Second, it will get to the shower faster because just the hot water is running and because the shower head is letting more water through. Just remember to turn it to a comfortable temperature before you get in!

Next, and this is probably obvious, for most efficient water usage, use the shower on the default, low flow setting when you’re just rinsing your body and doing general cleaning. But when you wash your hair, you’ll probably want to turn it to one of the turbo modes to make it easier to rinse the soap out. I’ve got pretty long hair for a guy and for me it works pretty well. But like I suggested in the video, if there’s someone in the household with long hair, they might not find the amount of water to be satisfactory. Fortunately, my wife and I have separate showers, so she can have her own shower head and I can have mine!

Corroding pipes, part 2 – proof!

Remember when I said that you should never, ever connect copper pipes to a steel water heater because this would cause your pipes to rot out and ruin your water heater? Well, at the risk of ruining my new miniature water heater, I purposely piped it the way 99% of the plumbers and HVAC technicians do to prove a point. Yes, it’s like volunteering yourself for medical research, but sometimes you have to make a point dramatically!

Take a look at the photo of the cold water supply line to my two week old water heater. I used a nice, galvanized pipe coupler to adapt the water heater’s connection to the 3/4” copper fitting. I then slathered the fitting with “pipe dope” – a substance used to create good connections when fitting pipe.

Already, after just two weeks, there’s a spot of rust dripping down the coupler. Remember – galvanized pipe isn’t supposed to rust under normal conditions. But this isn’t a normal condition! This is a living nightmare for the steel coupler because there’s a copper pipe screwed on it. Under this condition, we are guaranteed to get galvanic corrosion.

Just to make a point, I’m going to let the pipes corrode for a week or two more before installing the proper dielectric coupling. I’ll post some more pictures after I take it apart so you can see what has happened.

In the meantime, go to your utility room and see if you have a fitting like this with a copper pipe connected to your water heater. If so, it’s probably already started corroding. If it hasn’t, you’re lucky! It might just be that the plumber put so much teflon tape on the fitting that there’s no steel to copper contact. But you really can’t count on that.

At the end of the day, it’s futile to try to argue with physics. Spend a few dollars and get the proper couplers. You’ll thank me in a couple years when you don’t have to spend hundreds of dollars replacing your water heater and your pipes!