Yikes! Apologies for the lack of replies

I just discovered that WordPress had turned off my notifications again, so I hadn’t received any of your comments for a few months! I’m so sorry for this.

I’ve tried to get back to everyone who posted questions, but if I missed you, please post again, and I will get back to you as soon as possible. Thanks for your patience!

Ready for some good news?

Kudos MohawkIt’s easy to get dragged down by all the upsetting news – natural disasters, the stock market, wars, terrorism…if you believe the news, we’re living in horrible times, worse than ever before in history.

But step back and think about it. We’re living in a time with a quality of life unimaginable through most of history. Most of us don’t have to worry about famine or disease. Our houses are filled with gadgets that would have been impossible or cost millions of dollars just a generation ago. Our vehicles are cleaner and more efficient than ever. We live in comfort. Our lives are long. Technology and medicine are advancing at an accelerating pace.

I’m a realist, and to me, realism means seeing both the bad and the good in the world. So I started a company, OurKudos, that’s focused purely on the positive. I wanted a place people could go to smile and forget about all the negative “stuff” going on, maybe just for a few minutes. My hope is that, by exposing people to good news, that maybe they’ll get an attitude adjustment. Maybe by learning about the good deeds being done by local heroes, they’ll feel different about the people in their lives and maybe even try to positively change something in their community.

So I bring you the first public showing of OurKudos’ first step into “social good” – OKCheers!


Question: Hi Ted, I was wondering about the energy used in heating hot water. I have heard it is bo

Question: Hi Ted,
I was wondering about the energy used in heating hot water. I have heard it is bout 20% of my utilities. I have also heard that by insulating it with 6 inch fiberglass will help to improve efficiency. What do you think?

Answer:

Ugh, I wrote a really long article in response and tumblr seems to have eaten it. 

I’ll try again after I get over the annoyance of losing this great post!

For now, start with the article on water heaters I wrote for my website.

Here’s part one of my answer as a full post.

Got Mold? Part 3 – a flood doesn’t have to be the end of the world

By now, you’re probably terrified of water, and well you should be – it is a silent destroyer of homes. On the other hand, I don’t want anybody freaking out because they spilled a bucket or even a glass of water on the floor!

Mold doesn’t grow instantly. It needs time, water, and sometimes warmth. I’ve seen plenty of cases where people have had a serious flood in their homes – perhaps a toilet or sink flooded a bathroom, but these resulted in no mold. Why? Because the water was cleaned up quickly and everything was allowed to dry out.

The danger is when you let water or condensation get trapped somewhere. For example, I see this a lot – house-plants causing rotten wood, like shown above. There was a huge house plant sitting in a plastic pot. The pot didn’t leak, but periodically, somebody might spill a little water which would go under the pot and get trapped. Over time, it totally ruined the oak floor.

Trapped water is bad. Water left to evaporate is usually harmless.

Most of the mold and water damage I’ve seen occurs over a long period. Weeks, months or even years of neglect. So it usually isn’t a surprise when you find problems. However, like the proverbial slowly boiling frog, we often ignore a “little” condensation or a puddle of water. But, these are exactly the things that cause you to wake up one day and find that your window sash has rotted out.

A little moisture over a long period can cause serious damage.

Let’s look at a few scenarios and classify them as bad or not-so-bad.

Scenario 1:

Your toilet or sink overflows, but you catch it quickly. Maybe a couple buckets worth of water floods your bathroom.

First off, any time you have a water spill, the first thing to do is to clean up all the water (duh)! If you have a wet-use shop-vac, you can put it great use. Shop vacs do a wonderful job of cleaning up spills because they’ll suck the water off the floor and out of nooks and crannies. If you don’t, then use a sponge mop and soak up all the water.

When you’re done with the bulk of the cleanup, use an old towel to dry everything as well as you can.

Often, this simple cleanup will be enough if you catch the leak before it has a chance to really soak in. So beyond this, just run the bath fan for a few hours to flush out the moisture in the air or run a big floor fan in the doorway. 

All told, this type of “water event” can be pretty harmless. 

Scenario 1a:

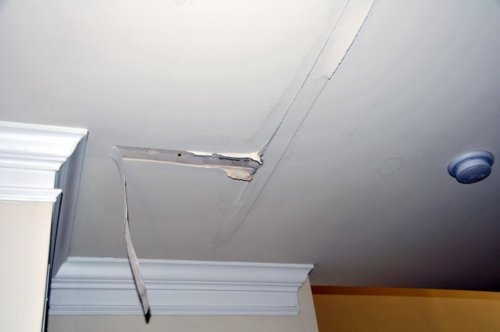
You flood the bathroom with enough water that it drips out the ceiling or light fixtures in the floor below. 

This could mean trouble. In most homes, you have the finish flooring, with a wood sub-floor underneath. This sits on the floor joists. Underneath, the ceiling material, usually sheet-rock, is nailed or screwed to the underside of the joists. If the water flooded down to the floor below, that means that a substantial amount is likely in this space around the floor joists which you can’t get to in order to dry it out.

As in scenario 1, you want to immediately clean up the water above. Forget the floor below (yet) – stop the water above from coming down! If you clean up the water and get the bathroom drying out, that will help the water evaporate and allow all the building materials to dry out. Remember – water “wants” to move from wet to dry areas.

However, your work isn’t done yet. There’s a good chance that your sheet-rock will pull away from the nails/screws that hold it up. When it gets wet, sheet-rock will turn to mush. Don’t touch it or you may destroy it. You also run the risk of having the ceiling collapse on your head.

The best thing to do is clean up all the visible water from the bathroom and the floor below and then put dehumidifiers in both rooms. Let them run for a couple of days. You literally want to suck the moisture out of the building materials as fast as possible.

If you’re a professional and have good toys, you can use a moisture meter. I have a few of these. They let me scan behind walls and ceilings without having to take everything apart. There are two types – the pin type, which is generally more accurate but requires that you stick the probes into the material, and non-destructive, which works on the electrical properties of the material which change with water content.

The problem is, if you don’t have one of these meters, you really don’t know how much water remains in the ceiling cavity. If that water isn’t totally dried out quickly, you’ll probably have mold growing in there. You will be very unlikely to have wood rot however because the water will get soaked up and evaporate over time so the conditions for continued mold and related problems decreases over time.

The question is, if you do get a little mold in there, is that a problem?

Before I answer, if you have any doubts whatsoever about you or your own family’s sensitivities to mold, contact a professional. Without actually examining your home, there is no definitive information that anybody can give you. In other words, if you choose not to have a professional evaluate your problem and your house collapses or you die of mold allergies – don’t blame me!

There is a school of thought that as long as you get rid of the water let the mold grow in the first place, you don’t want to mess with it, especially if it’s safely trapped in the walls or ceiling.

What would I do? When I’ve had situations like this in my own home, usually after I’ve dried things out, I will cut a hole in the ceiling – maybe 16” square. Large enough to poke my head into and check things out. Sheet-rock is easy to patch, and you’re better safe than sorry. Though now that I’ve got those excellent moisture meters, if they indicate that it’s dry in there, I don’t worry about it.

Scenario 2: 

You’ve had a flood that you didn’t discover for a couple weeks.

This is bad news, really bad. I’ve seen homes totaled by this. Seriously.

This typically occurs when a pipe bursts in a vacation home. Or a rat chews through the water lines of your dishwasher or washing machine. The water pours out, gallons every minute, for the entire time. It’s horrible. Thousands of gallons flooding into every corner of the house, soaking into the carpets, up the walls, into every cavity.

In a situation like this, the only solution is to call in a water damage specialist. Hopefully your insurance will cover this, because it will cost thousands of dollars and take potentially weeks to dry out your home and determine if it’s habitable.

Here’s what they’ll do.

First, as in any of these situations, they’ll turn off the water to ensure that no more water enters. Next they’ll remove the “bulk water” so that it can’t cause further damage. This is the easy stuff.

Next, they’ll probably want to remove all the water soaked materials. This might include sofas, carpets, beds, anything that is wet and holding moisture. If they leave these giant wet sponges in the house, it will be extremely difficult to dry out the house.

After that, they’ll use industrial strength dehumidifiers and fans to dry out the air. The fans help to evaporate the water and the dehumidifiers suck the humidity out of the air. 

If you’re lucky, they’ll make measurements using meters like I mentioned above, and they’ll determine that the interstitial spaces (i.e. inside the walls and floors) are dry. However, with this type of flood, it is extremely likely that the insides of the walls and floors will be saturated with water. This can be extremely difficult/impossible to dry out without opening up the walls.

As you can see, this is really serious. If you encounter this type of scenario, don’t mess with it!

Got Mold? Part 2 – Crawlspaces and Moisture

Crawlspaces – they are some of the nastiest places around your home. Usually they’re filled with cobwebs and dust. They’re too low to move around in comfortably. And often, they’re filled with moisture, mold and wood-eating insects.

Because of this, most people avoid them. I had the misfortune of being the guy who spent every working day in these spaces until my knees and back deteriorated to the point that I couldn’t do it any more. So I’ve seen a lot of *yuck*. I’ve seen floors that were about to collapse. I’ve seen standing water. I’ve seen more rotting, dead mice than I ever wanted to. And I’ve seen mold. Boy, have I seen mold.

Unfortunately, the picture above is more typical than not. Most people’s crawlspaces are moist enough so support mold growth on the paper backing of the insulation between the floor joists. By the way, did anybody ever tell you that mold loves cellulose (i.e. paper)? So that insulation you put down there is a perfect place for mold to grow. Once it does, it basically eats the paper and your insulation falls down. Now you have a big, soggy piece of fiberglass sitting on the ground – mice love it, so they’ll use that as nesting material. It gets really nasty.

Mold 101

Remember what I wrote in earlier postings? Mold is everywhere and mold loves humidity. Give them proper conditions for growth and they WILL grow like crazy. And when they grow, they need to eat. Google “dry rot” and you can read more articles than you want about the topic. Here’s one.

Why Crawlspaces?

Most crawlspaces have been built incorrectly since the dawn of time. Or at least since builders started getting cheap and building crawlspaces instead of a real basement.

Let’s start with the worst type of crawlspace – the dirt floored crawlspace.

What is dirt? Well, technically, it’s basically a big sponge. Dig down a couple feet outside and what do you get? Damp soil. Damp means water. That water travels through the “sponge” and into your crawlspace. Then what? Well, physics dictates that water will move from damp spaces to less damp spaces until the two are at the same humidity level. So the moisture in the ground “wants” to evaporate and saturate the air in your crawlspace.

Unfortunately, since there’s an infinite amount of moisture in the ground, there is continuous supply of moisture moving from the ground into your crawlspace. This leads to the Sisyphean task of trying to dry out a crawlspace with a dirt floor. (You remember Sisyphus – he was the guy damned to roll a boulder up a hill for eternity and every time he made progress, the boulder rolled back to the bottom).

So what do you do? Most people will Google it, and go to the first link. They’ll then be confronted with a bunch of bad advice from idiots who don’t know physics, moisture dynamics, or the first thing about why and how problems arise.

Instead, use this search on the BuildingScience.com website. Joe and his crew are building scientists – they actually understand the problem. So don’t pay attention to what anybody else says on a discussion group, go straight to the source.

Since you’re still here reading, I’m assuming you looked at BuildingScience and decided it was too technical, so you want to hear about how to fix the problem in plain English.

So here you are, stuck with a damp crawlspace and you want a solution. You’ve tried a dehumidifier and ventilating the crawlspace, and all that happened was your electric bill went up $100. Maybe you got lucky and it dried out until the next rain, at which point you ended up with puddles but you were still out $100 and were no closer to a solution. Now what?

Ok – you have to do a little detective work. First off, if you’re getting puddles in your crawlspace, you’re either built on a natural spring, or the drainage around your home isn’t done right. Pray that it’s not a spring, because I can’t help you there. Sell your house and move, now….

Let’s assume that it’s a drainage problem. Walk around the outside of your house looking for drainage problems. For example:

That is the number one cause of water in the basement or crawlspace – the downspout isn’t attached or is dumping water right onto the foundation walls.

So the first thing you want to do is to make sure your gutters work properly and the downspouts drain at least 6’ away and downhill from your house. Don’t take shortcuts! You have to get the gutters properly draining away from your house.

If you’re serious about it, you’ll have the gutters tied to a drainage system going to a dry well far away from the house.

Why is this so important? Because, when it rains, your gutters are trying to dump thousands of gallons of water and if you dump that much water around your foundation, it’s going to come into your house, which will raise the humidity and lead to moldy conditions. Not just in your crawlspace, but maybe in your attic and everywhere else. Proper drainage is key.

The next bit of detective work requires that you get muddy and wet. I know, you don’t want to get yucky, but tough it out. It’s better than having your house collapse due to all the water and mold rotting out your crawlspace.

Go outside during a heavy rain and walk around the perimeter looking for puddles. Take pictures so you know every place things aren’t right. This might be caused by gutters overflowing or poor grading or local depressions in the soil. 

Then, go inside and look at the basement and crawlspace walls. Do you see any streaks on the wall or other signs of moisture?

Maybe you’ve got something like this? That’s usually not a good sign!

Just use your head! If you don’t want water in your basement/crawlspace, keep it away from your house to start with. Note every place that doesn’t look right. Every puddle outside. Every water streak inside.

You may have to have some landscaping done. The soil around your house must slope away from the foundation or the water will get in.

So this is all step one – keep the water out in the first place. For most people, properly grading the ground and fixing the gutters will do the trick. If that doesn’t work, come back and read my next post. I’ll talk more about this topic. Until then, go work on your gutters. Please, please, don’t do this:

If you do this, you may as well just put a hose in your crawlspace and turn on the faucet!

There’s No Such Thing as a Small Leak!

Writing these posts have reminded me of all the horrors I’ve seen in buildings and homes. Unfortunately, some have been in my own house! This is one of those (unfortunate) cases.

This all happened some years before I got into the building science business, so I didn’t know the warning signs to look for, and it cost me dearly!

Not long after I moved into my home, we started hearing loud “settling cracks” coming from our kitchen, which has an attached sunroom. For a long time, we didn’t think much of it. The house was built in 1957 and had gone through various renovations before we moved in, so we just attributed it to natural 

Then strange things started happening. A large crack appeared in one section of the wall and floor tiles in the sunroom were breaking. However, this time, we attributed it to poor installation. Contractors echoed this sentiment, so we let it go.

Finally, in the middle of winter, after a particularly loud *CRACK* coming from the kitchen, I went to explore. It was then I noticed a blackening on the wall behind the kitchen table. I thought “mold”, and went to explore. Like any guy, I poked at it with my finger. Unfortunately, my finger went right through the wall! This was the start of a long night…

As I continued to poke at the wall, I discovered that the entire short wall, on which the prefab sunroom was installed, was rotten. This must have been going on for years because almost all the 2×4 wall studs had turned to mud – completely rotten. Argh!

By the end of the night, I had removed most of the floor tiles and all the rotten wall parts and found pressure-treated lumber to support the sunroom. Frankly, I was surprised that the entire sunroom hadn’t fallen down – it was that bad.

So What Happened?

What I discovered during the deconstruction was that all the materials were wet. This included the exterior walls and the subfloor under the tiles, which by now had rotted out too.

The following day, after I’d warned my wife not to set foot in the sunroom and start getting bids on rebuilding the kitchen, I went outside and studied the stone wall on which the sunroom was built. I also looked from the inside to see if I could find the source of the water. In fact, it was quite easy to find – I could see daylight through the wall! Further inspection showed that the builders were depending on caulk to water-seal the structure. This is a common cause of leaks.

Sidebar – Rant about Caulk

Folks, caulk is never to be used, especially on the outside of a house, as the primary line of defense against water leaks. If you use caulk, it will eventually give way and lead to a leak. I guarantee this. No matter what any contractor, brother-in-law or best buddy tells you. Caulk should not be used this way.

Think about it. You’ve got two different materials – in my case, an aluminum sunroom sitting on a stone wall. The massive stone wall changes size very little as it warms and cools while the aluminum changes dimensions considerably. In technical terms, the “coefficient of linear expansion” of aluminum is high compared to that of sandstone. If you want numbers, it’s double. And caulk? That expands and contracts ten times as much as metal and stone!

What that means is that if you go from 0F in the winter, to 100F in the summer (higher if the sun is shining on it), over the 8ft length of the sunroom, the aluminum will expand between one and two millimeters more than the stone and the caulk wants to change length by about an inch. If this happens repeatedly, and you combine these forces with the shrinkage of the caulk over time, the result is a guaranteed leak.

So if you’re considering using caulk in this way – don’t do it. Fixing the damaged caused by that $3.49 tube of caulk will cost you tens of thousands of dollars. 

Back to the Leak…

What else did the builder do wrong? Well, they ignored a piece of information that any grade-schooler could tell you – water runs down hill and puddles on flat spots. Why do builders think that they can ignore the laws of physics?

In this case, they built the sunroom on a flat topped stone wall. So when it snowed or rained, the water would sit on the wall – the only water barrier being a little bead of caulk. Not to mention that SANDSTONE IS WATER PERMEABLE, so any water that sits on it can wick around the caulk and enter the house.

The solution is relatively simple. Slope the top surface so that water flows away from the house – yes folks, water runs down hill. Use this to your advantage.

There’s No Such Thing as a Small Leak

This leak, caused by poor design and improper use of caulk, went unnoticed for a decade until my sunroom almost fell down. I won’t tell you how much it cost to fix it right. But it was such a painful learning experience. In fact, I’m here writing this today largely because of what I learned. Unfortunately, one of the most important things I learned is that some builders ignore the science of building and instead just focus on cosmetics. Remember, you cannot win the fight against physics!

What other problems can arise due to “small” leaks? Well, have you ever had a slow drip somewhere that you didn’t fix? You know, one of those leaks that maybe you just put a bucket underneath so that it wouldn’t stain your carpet?

Well, if you did that, you risked having your house collapse. Maybe not all at once, but it starts with a slow drip. Who knows where the drip started. Perhaps it was running down from the roof, working its way down a rafter, dripping on the attic floor, migrating down a wall, puddling on the ceiling, then finally dripping on your floor.

Every area that is subject to repeated wetting like this might, over time, get moldy then get eaten by termites or mold-related products. I’ve seen support timbers that became so soft I could poke my finger through them. Do you want this holding up your house? What happens during the next big snowfall or wind storm that puts pressure on your home? Seriously – this is life threatening stuff!

So if you ever discover a “small” leak, don’t wait till next month, or next year to have it fixed. Immediately, try to find the source of the leak. If it’s a leaky pipe, shut off the water to that pipe and have it fixed. If it’s a leaky roof, get it fixed correctly. Whatever the case, you need to dry out all the building materials, preferably with fans and dehumidifiers, as soon as you can, and get a professional in there to fix it.

A note about mold: some people have sensitivities to mold, others don’t. If you have moldy conditions, you have to deal with the source of the water, or the mold will keep coming back. But whatever you do, if you have any concerns, call in a mold remediation specialist. I can’t stress this enough – a specialist! Not your buddy who does carpentry on the side. Probably not your builder. A specialist who knows how to safely get rid of the mold and prevent it from coming back.

Got Mold?

If you’ve ever owned a home, you’ve probably had mold at some point. Mold on the wall. Mold in the shower. Mold in the basement. Maybe mold in the attic, like shown in this picture.

Mold spores are all around, floating in the air, on surfaces, in your house plants, wherever you look, you’ll find mold spores. This is perfectly natural!

On the other hand, when mold grows uncontrollably, like shown above, it can cause horrible damage and have serious health ramifications if you have sensitivities.

So what causes mold to go from benign to growing like crazy? 

The answer lies in humidity. Mold needs moisture in which to grow. That’s why you often find mold in showers and basement. But not just any moisture, but high levels of moisture. “Ok,” you say, I understand showers and basements. “I can run the bath fan for a while after a shower and flush out the humidity” (yes, you should run the bath fan for about 20 minutes after a shower!) “And I put a dehumidifier in the basement to help that problem. But what about the darned attic?

Let me tell you about attics! But first, I have to tell you about condensation…this won’t be painful, I promise.

What is condensation? It’s simple! – it’s just the water vapor in the air finding a something cool enough to for the water vapor to turn into liquid water. Warm air can hold more water vapor that cold air. That’s why the window in the bathroom gets covered with condensation when you take a shower. The air in the shower is hot, and saturated with water vapor. Everything else in the bathroom is cooler, but the window (in the winter), that’s really cold. So that’s where you see the condensation. 

“Ok”, you ask, “but what about the attic!?” 

Here’s the deal. During the winter, do you heat your attic? Hopefully not. There’s probably a lot of insulation on the attic floor, trying to keep the heat in the house and the attic cold. Aha! The attic is cold! And what about the roof? It’s really cold, especially on the north side of the house which doesn’t get any sun.

So, any moisture that gets into the attic is going to condense on one of these cold surfaces. Where the moisture condenses is a big clue as to where the moisture is coming from.

For example, in the picture at the top of this post, it’s immediately obvious that the moisture is coming up that roof cavity and condensing on the cold roof in the attic. In fact, that wood is saturated with water – literally dripping! That means there’s a lot of moisture coming up that cavity.

How’s that happening? Well, I can tell you with 100% certainty that the moisture is NOT coming from the outside. Why? Because the outside air is cold and dry. If it were going to condense, it would have condensed outside, not on your roof. So rule that out.

If not from the outside, it must be coming from the inside. AHA! Remember, warm air holds much more moisture than cold air and inside the house, there are showers, animals, cooking, breathing, house plants and so on. All putting moisture in the air. That moisture rises up through the house and follows the ceiling upwards. And what’s above the ceiling? The attic. 

But how does that moisture get into the attic? You’ve got walls and ceilings and sheetrock. What gives?

Water is a tiny, tiny molecule. When in its vapor form, it’s still tiny – vastly smaller than liquid water. Think about a balloon. Even the tiniest hole and the air comes rushing out. It’s the same with your house. That recessed light you installed? That’s filled with holes. Ceiling Fan? Holes! Electrical outlets? Holes! Door frames? Holes. 

There are holes everywhere!!! And any moisture in your home is going to find those holes. In fact, during the winter, literally gallons of water is moving from the inside of your house into these cavities – walls, attics, etc.

In small quantities, the moisture harmlessly flushes out and is dried out by the winter air. No problem. But get a big enough hole, like around recessed lights, and you’re fighting a losing battle. Seriously. Recessed lights are one of the biggest problems I encounter because they’re never installed air-tight. NEVER.

And so, almost every roof that I look at that is near recessed lights, is covered with mold. There’s probably millions of dollars of rotten roofs caused by recessed lights. This is made worse by the stupid practice of installing ridge vents on homes in an attempt to add ventilation. 

This is a controversial statement, so let me explain further. What’s the purpose of a ridge vent? It’s to give air a place to rise up and out of the attic. Well, if air is leaving the attic, where does it come from?

In many cases, there’s no place in the attic for air to come in and replace the air that’s going out the ridge vent. So what happens? That ridge vent sucks the air out of the house – exactly what you do not want to happen!!! So the better the ridge vent is working, the more moisture is getting sucked from your house into the attic and the more mold problems you’ll get. This is why so many contractors actually make attic mold problems worse. They’re just solving the problem the way they were taught – add more ventilation!

The Solution

Before you panic, there are solutions.

First, remember, moisture problems and mold occurs where warm moist air comes in contact with cooler surfaces. So how do you avoid the problems?

  1. Don’t let warm, moist air out of the house
  2. Don’t let warm, moist air touch cold surfaces
  3. If warm, moist air does get into a cold space, get it out of there fast.

Got that? It’s that simple. If you follow these rules, you cannot have moisture and mold problems.

So how do you do this?

  1. If you don’t have recessed lights, don’t add them! 
  2. If you already have recessed lights, seal them airtight. This requires some handy-work. Seal the circle around the perimeter between the light fixture and the ceiling. This can be done with spackle and high temperature silicone caulk. All the holes in the fixture? A dab of caulk or some foil tape can largely seal those.
  3. If you have other holes in your ceiling, seal them up the same way. Pretend you’re building a submarine. Seal all the holes like your life depends on it. Read this article on cathedral ceilings.
  4. If you’re building a house and you want cathedral ceilings, read this article. Then have at least 4” of closed cell spray foam applied directly to the underside of your roof. You’ll be shocked at the price, but consider this – if you use fiberglass and your roof rots out, you’ll spend at least $10,000 to redo your roof. Spray foam will seem cheap in comparison.
  5. If you’re ventilating your attic, do NOT just add a ridge vent. You have to install a ridge vent AND matching soffit vents. Or, do it the old fashioned way, and install gable vents on each end of the attic so that the air can flow through. You can’t just have one vent. Air has to flow in and it has to flow out.

When you’re all done absorbing this, read my other articles. This is probably the most far reaching and potentially complicated topic I’ll write about, so there’s lots of material!

Basement insulation and moisture

Bathroom venting

Cathedral ceilings

Good luck!