Ducts – How bad are a few leaks?

Air return duct - wide open

Let me give you a hint – leaky ducts can kill you.

No joke. Duct leaks are serious business, and yet, most people have no idea just how important ducts are. I’ve had arguments with HVAC contractors over poor duct installation practices. Frankly, it’s criminal when ducts are installed like they are in the picture above. I mean, what were they thinking?

Ok, let’s take a step back. What is the purpose of ducts? They’re there to move air around your house – distributing heating and cooling as uniformly as possible to keep your house comfortable. Most homes have two types of ducts – supply and return

Supply Ducts

The purpose of supply ducts is to supply conditioned (heated or cooled) air to various rooms in the house. Each room has specific requirements, so proper duct design is a science. How big is the room? Does the room get a lot of sun or is it shaded? Is it upstairs or down? Does it have lots of windows? How much insulation does it have in the ceiling and walls? How far is the room from the furnace?

All of these factors affect the supply duct design. Unfortunately, most installers take a “cookie-cutter” approach, and just put one or two supply registers in per room and call it a day. If you’re lucky, they’ve installed dampers so that they can adjust how much air gets to each room.

Assume that they do all these things right. What happens when the ducts are leaky? Now all the calculations go out the window because the needed air isn’t reaching each room. In extreme situations, I’ve seen rooms receiving *no* air! Often this occurs when the ducts run through the attic and one has become detached. So now, all the air that’s supposed to be supplying heat to a room is spewing into the attic. How much do you think that costs you in wasted energy?

Return Ducts

Return ducts are used to “return” air back to the furnace or air conditioner. Think about it for a second – every room should have a balanced air supply, with the same amount leaving as is entering. Otherwise, it’s like blowing up a balloon. If the door is closed, the system is trying to blow air into a closed space. What happens then? The excess air tries to make its way out. Sometimes it will go out into the hallway and makes its way back. Other times, it leaks outside, so again, you’re wasting energy.

Think about what happens when the return duct leaks in the attic. Any leak in the attic sucks air into the ducts from that nasty space, usually filled with dust, mouse droppings, and fiberglass, as well as the obvious outside air that might be cold or very hot. So, return air leaks are bad, really bad. They’re unhealthy and really hurt your energy efficiency. How much? The example shown above where the filter port is open will decrease the system efficiency 30%-50%!

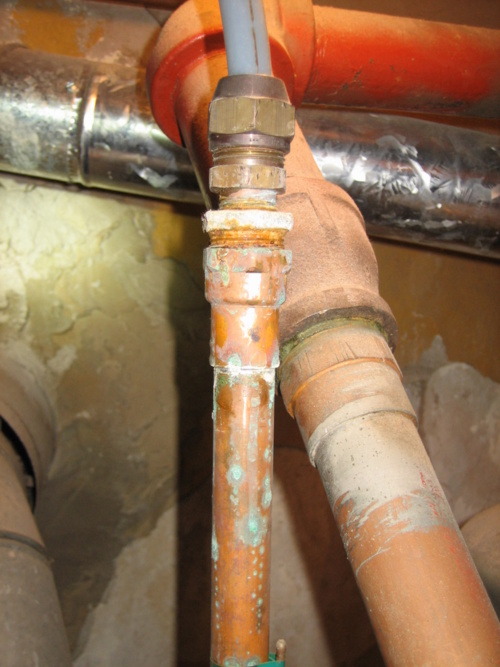
Now, what happens if you have a duct leak in the basement, like shown at the top of this article?

Well, first off, the room upstairs that’s supposed to have a working air return doesn’t, so the air flow won’t be proper. That’s the good news. The bad news is that a return air leak this big can suck the air out of the basement, creating a low pressure zone in the house. So low that it can literally suck the exhaust fumes out of the furnace or water heater or make it malfunction so that it generates carbon monoxide. In fact, it can kill you. 

This problem is so serious that the Building Performance Institute (BPI) requires all certified energy auditors to test for these potentially lethal conditions. And remember, you might have several things working to create dangerous conditions – the leaky return ducts, the clothes dryer (which might be expelling large amounts of air from the basement), the furnace (which also uses air for combustion), and the water heater. There are also natural forces at work that make basements lower pressure.

So when an installer takes shortcuts and doesn’t seal your ducts air-tight, not only are they robbing you and maybe making you sick, they could kill you. If you’re having duct work done, or a new house or addition built, insist on having the ducts tested. I will cost several hundred dollars more, but what price do you put on your family’s life? Don’t take shortcuts – make sure it’s done right.

Want some duct fixing supplies? I’ve put together the best items for this on an Amazon store. Check it out and support this site. 

Dam ice Dams

Link: Dam ice Dams

Want to learn the “building science” of ice dams? Building Science corp has an amazing set of notes on building problems and precautions. I consider them the source for building information relating to tricky issues that tend to foil most contractors.

High Electric Bills, Wasted Energy & Central Humidifiers

It’s winter, and for many people, that means dry skin, cracked lips and nosebleeds, so I’m often asked about whole-house humidifiers – humidification systems that connect to your central heating system to distribute moisture throughout the house.

As noted in another post, I’m not a big fan of these units. Any time you concentrate humidity, you run the risk of growing mold. A little leak in your duct system and you could be squirting moisture into walls, ceiling cavities or other areas where you might not know there’s a problem until the entire thing rots out.

It is vastly preferable to use standalone units that use cold water, a small fan and a pad to soak the water. These units are very energy efficient. But beware, there are energy hogs among the small units too. some of them have electric heating elements to evaporate the water and use ten times the electricity as the simpler models! 

In spite of my personal aversion to these units, I recently worked with a friend to track down the source of her high electric bills. She’s an engineer too, so she was reading manuals and trying to uncover the problem. 

As it turned out, she told me “Ted – I have a whole house humidifier, could that be an issue? It runs on hot water.” I’ve heard of this before. Units that squirt hot water into the air stream of the heating system. The trouble is, her unit worked very inefficiently, running the hot water the entire time the heating system is on!

Let’s look at this. This system was basically leaving the faucet on for 8-16 hours per day, using 50-100 gallons of hot water just to put a few gallons of moisture into the air. What a horrible waste!

When you run the numbers, you find that, at the low end, this was costing her $30/month to run. However, with high electric rates in the northeast U.S. and cold winter days, this number is about $100/month! 

Fortunately, there are other ways to solve the problem. If you must have a whole-house humidifier, look for one that doesn’t use hot water and doesn’t run the water the entire time your heating system is on. You’ll have to do your homework, and maybe argue with your heating contractor who will just want to install whatever unit they have sitting on their truck. But it’s your utility bill, so don’t settle.

Guidelines for choosing a whole house humidifier:

  • It should run on cold water, not hot water
  • It should only run if the humidity is below the set point
  • It should not run water continuously when the heating system operates

In addition, whole house humidifiers can be breeding grounds for mold, depending upon the design, so make sure you service it regularly. That means draining the unit and opening it up to clean it out as per the manufacturer’s instructions. Off-season (typically Spring, Summer and Fall), they should be disabled, otherwise they work against your air-conditioning system causing it to work extra hard.

So if you have high utility bills this winter, check to see if you’ve got a whole house humidifier. It could be pouring your utility $$$ down the drain!

If you find Ted’s Tips to be useful, please support my work and visit my Amazon store. In it, I’m collecting the products mentioned in these articles so you don’t have to hunt all around the web to find them.

Don’t let your heating system kill you!

Boiler flue disconnected from chimney

In light of the recent tragedy in Allentown Pennsylvania (more or less just down the street from my house), I thought it important to remind my readers of the importance of maintaining their heating systems.

Tragic accidents like this don’t have to happen. But every year, people die in explosions caused by gas or propane leaks or are poisoned by carbon monoxide due to improperly functioning heaters. What can you do to minimize the chance of this happening to you?

  • Inspect your system now, checking for any irregularities
  • Install carbon monoxide detectors throughout your home
  • Have your systems professionally inspected every year
  • If you smell gas, air out your home, evacuate, and call the gas company

Inspect your system

A simple visual inspection will often reveal dangerous problems. Look for anything that doesn’t “look right.” For example, the photo at the top of this page shows the exhaust flue connection to the chimney. Does this look right? This system could easily have been spewing carbon monoxide into the home, making the occupants sick or even killing them. 

Check for any signs of improper installation or operations. Any drips or leaks should be addressed professionally – most homeowners do not have the proper tools or training to safely repair their heating systems. You wouldn’t operate on your child would you? This is no different.

Install carbon monoxide detectors

Any home with combustion devices (gas, propane or oil) should have carbon monoxide detectors on each floor, located as per manufacturers instructions – typically close to the bedrooms.

Amazon.com sells a wide variety of detectors, one of them caught my eye because it does more than just sound an alarm – it shows you the CO levels in your home:

Kidde Carbon Monoxide Alarm with Digital Display

This is a very reasonably priced unit, well worth it. 

Keep in mind that most CO detectors/alarms only alert you when the CO levels rise high enough to make you sick. Personally, I’d rather be warned before I’m being poisoned! 

Remember – CO detectors, like smoke detectors, have to be replace about every five years. If you’ve got an old unit, throw it away! The detectors deteriorate over time.

If you smell gas, do something about it!

Frankly, I don’t know why anybody would live in a house that smells of a gas leak. The gas company adds an odor to the gas for a reason, and if it gets strong enough to smell, it’s worth fixing.

Do not listen to a technician who says “it’s nothing to worry about.” This simply means they don’t have the proper tools to find and repair the gas leak. Find another technician, qualified to diagnose and repair leaks, and don’t accept no for an answer.

A professional will have an electronic device that looks like this 

It is capable of detecting minute quantities of gas. They should trace every inch of your gas pipes, especially around connections, until they find the leaks. Once they find the location of the leak, they will spray a soapy solution on the area to verify the leak (leaks will make soap bubbles). After that, they’ll have to disassemble the pipes and redo the connections properly.

Have your systems inspected yearly

Finally, make sure to have your systems inspected every year. This is your family’s life that’s at stake. Hire a reputable heating company and have them do a full test and cleaning on your system every year. It’s not worth waiting until there’s a problem, because by that point, your system could have killed you. A little preventative maintenance goes a long way.

If you find Ted’s Tips to be useful, please support my work and visit my Amazon store. In it, I’m collecting the products mentioned in these articles so you don’t have to hunt all around the web to find them.

Why are my pipes rotting out?

You’re probably wondering why a blog on energy efficiency is writing about rotten pipes. I’ll cover pretty much anything related to things going wrong in a home, so feel free to ask questions!

Pipe corrosion is a real issue. Even long time plumbers can’t seem to get it right. The reason pipes like this corrode is simple – when you connect two different types of metals together, they act like a battery and one side will be sacrificed to the gods of “galvanic corrosion.”

This is a given. It’s physics and chemistry and it happens. So what went wrong in this picture?

The plumber had an issue – they wanted to connect a 3/4” copper pipe to a 1/2” brass pipe. So they reached in their toolbox and pulled out a steel adapter and screwed it in. In the process, they created a battery that started eating away at the steel adapter. Once it reaches this point, that $1.49 adapter now costs you several hundred dollars because the plumber is going to have to cut the pipes apart and find a new way of connecting them. And you know what? They’ll probably do the exact same thing again. It makes my head explode!

Repeat after me – corrosion is not caused by leaks, it’s caused by electrical interactions!

You must never let dissimilar metals come in direct contact with one another! Keep in mind that some are similar enough, like brass and copper. They won’t destroy one another. Steel and iron are basically the same. But copper and steel is a no-no! Stainless steel and copper will also cause problems.

How do you fix this? You buy a $10 piece called a dielectric union. This electrically isolates the two metals, letting you connect them without problems for years.

Rather than duplicate what’s been described hundreds of times around the web, I’ll just point you to a great article on Hammerzone.com.

Feel liberated now. You probably know more than your plumber. And don’t believe it when they try to tell you that they can connect copper and steel. It just ain’t right!

Question: Ted – I don't know what to do! My electric bill doubled last month and I don&

Question: Ted – I don't know what to do! My electric bill doubled last month and I don't think anything changed about my house. Help!
Answer:

If you have an electric water heater, the first thing to check is if you have a water leak somewhere. This is usually caused by a dripping hot water faucet. It’s amazing how much energy is wasted by a slow water leak.

A second thing to check is the thermostat on the water heater. If the thermostat is malfunctioning, then it might be heating the water way too hot, which would lead to excessive energy usage. If this is the case, it can actually be very dangerous because it can cause a tremendous pressure buildup inside the water tank if the pressure relief valve isn’t working. If it is working, the heater will periodically “beltch” boiling water out the relief valve, which can also be dangerous. Check for puddles around your water heater.

You may also find that the water coming out your faucet is extremely hot. However, most systems are required to have a tempering valve the prevents the water from getting too hot, so you might never know.

So start with your water heater. If that doesn’t work, I’ve got a few more tips…

Are your heating dollars disappearing?

Leaky ducts are a prime cause of high utility bills

If you’ve got something like this in your attic, then a good portion of your utility bill is being wasted. Unfortunately, sights such as this are more common than you might think. Studies have shown that a typical house may lose around 30% of its energy because of leaky ductwork and my analysis have shown that this may be an underestimate.

A typical heating/air conditioning system contains a blower capable of moving around 1500 cubic feet per minute (CFM) of air. Normally, the air resistance and dampers in all the different sections of duct even out the flow so that each room might receive about 100 to 150 CFM of air. But when a duct has fallen off, like shown here, the resistance to air flow is much less because the air doesn’t have to travel through all the ductwork. Because of this, one detached duct may allow 300 CFM of air, or about 20% of the total system capacity(!) to escape. In fact, that may be an underestimate of the losses.

Unfortunately, the situation is often much worse. During the winter, the warm air in your house will rise up through your ductwork and out the leaky ducts in the attic. So you are losing energy round the clock.

If you ever feel a cold draft coming out of your heating registers during the winter, especially when it’s windy outside, chances are you have leaky ducts somewhere. Or, if you find that you get very poor airflow AND cold drafts, that’s almost a guarantee of a detached duct. Find that in the attic and attach it properly. Or, if you’re not “handy”, hire a professional HVAC company to come in and check out your ducts.

So before you spend thousands of dollars installing a new heating/cooling system, you might spend a few minutes in your attic looking for bad ductwork. Fixing a single problem like the one pictured above can increase your system’s efficiency as much as installing a typical high efficiency system!

How Can Your Bath Fan Cost You $20,000?

Bath fan venting ino the atticAn improperly vented bath fan can lead to tens of thousands of dollars of damage to your home and even create a health risk. How? *Moisture!*

The main purpose of a bath fan is to remove moisture from the bathroom after you take a shower. The reason you want to do that is that all that excess moisture can lead to mold and potentially cause your paint to peel and may even rot out your walls. So why do people dump all that water into the attic? Basically, because they’re too stupid and lazy to vent it properly – straight up and out through the roof.

How bad can it really be? Bad! I have had many clients with moldy attics due to this improper fan venting. But one in particular stands out in my mind. It was a beautiful custom home – no expense was spared. I was called in due to mold in the attic. Usually, this means a little patch of black on the roof plywood. But when I opened the door to this attic, I was greeted by a roof covered with fuzzy mold. Everything was damp. This was a problem!

After searching, I found the culprit – the builder had routed the bath fan duct under the fiberglass insulation over towards the soffit (the overhang where the roof meets the house). Often this are has a little bit of ventilation, so many lazy builders run bath fans to this area. However, in this case, there wasn’t even any ventilation slots in the soffit, so the bath fan was just dumping all the moisture straight into the fiberglass insulation.

The homeowners had to spend thousands on mold remediation. They then decided to re-insulate the entire area using spray foam and had to pay to get added attic ventilation to avoid this problem in the future. All because the builder was too cheap and lazy to add a $25 roof vent cap and run the bath fan to it.

Broan roof vent cap

So if you ever consider venting a bath fan into the attic, remember this story. Always vent bath fans straight up and through the roof. Use insulated ductwork from the fan to minimize the chance of condensation in the duct. And use a high quality roof cap, like this one from Broan.

Why not vent out the soffit?

I’ve had some builders argue with me, saying that it’s ok to vent out the soffit. They claim it’s safer because you don’t want to put more holes in the roof because of the risk of leaks.

First off, a high quality, self flashing roof cap like the Broan shown here is very easy to install water-tight. I did two myself and I’m an engineer, not a builder. So scratch that argument – it’s bogus.

Next, think for a moment. What does warm, moist air do? It floats up! Duh. So if you try to vent a bath fan out the soffit, that warm moist air is just going to rise back up through the soffit and back into the attic. It’s hardly better than venting straight into the attic. So under no circumstances should you accept soffit venting of a bath fan. Save $50 on installation today, pay thousands for mold remediation and a new roof tomorrow!

The only acceptable alternative to roof venting is sidewall venting. You might do this when you have a slate roof. In this case, you can route the vent to the nearest exterior sidewall. it’s not perfect, but it will do if it’s not too far away.

Why Attic Insulation is a Big Deal A properly insulated attic is supposed to have about R-

Why Attic Insulation is a Big Deal

A properly insulated attic is supposed to have about R-40 insulation everywhere. This means that the insulation reduces heat loss by a factor of 40 – pretty simple eh? That also means, R-20 roughly equals twice the heat loss as R-40. R-10 is four times the heat loss and so on.

So what’s the R-value of an area of ceiling with no insulation? As it turns out, bare sheetrock on the ceiling has an R-value of about R-1. This means that every square foot of uninsulated ceiling loses about forty times as much energy as a square foot of properly insulated ceiling! 

Put another way, if you have one square foot of uninsulated ceiling, it’s losing as much energy as forty square feet of normally insulated ceiling. So what happens when you have a hundred square feet that are uninsulated, like in this photo? Well, the energy loss from this section of attic are about what the energy loss of a 4,000 SF attic would be!

The take home message is – details matter! Every square inch of your attic should be fully insulated. And if you’re an electrician, take the time to put insulation back carefully after you’re done running wires in the attic. If you don’t you’re basically robbing your customers.

Why’s the air so dry in the winter?

Do you ever wonder why your skin cracks and dries out in the winter? Why you get nosebleeds and sore throats? Why you can see your breath when it’s cold out? It all comes down to physics!

Tell Me Why I Can See My Breath When It's Cold

The air can only hold a certain amount of water and the colder the air, the less water it can hold before the water condenses. When you exhale, your breath is warm and contains lots of moisture. As your breath cools down, it eventually reaches a temperature where the air can’t hold all the moisture and you see a fog.

You’ve probably heard the weather forecaster talking about the “relative humidity” (also called RH) of the air. It’s relative because it depends on the temperature outside. For example, if it is 20F outside and the relatively humidity is 80%, when you take that air, bring it inside and warm it to 70F, that same air will only have a relatively humidity of about 15% – very dry indeed!

So during the wintertime, even if it’s very humid outside, when that air comes into your home and warms up, it is very dry air. And dry air wants to suck the moisture out of your skin, leading to chapped lips, nosebleeds, and generally uncomfortable living conditions.

Interestingly, in a normally sized home, overly dry inside air is also a giveaway of a leaky house because most homes have a fair amount of moisture from internal sources – people and pets breathing, watering plants, showers and cooking. All of these dump moisture into the air. In a tight house, this would be more than enough moisture to keep things comfortable in your home. But in a leaky home, the moisture is leaving through all the cracks and the really dry outside air is coming in creating a double whammy that dries out your home.

So if you have dry conditions inside your home during the winter, the best thing you can do is to tighten your home so that less warm, moist air leaves. This could involve getting better windows or putting that shrink wrap plastic over your windows. You can also tighten your home by fixing doors so they seal better. But one of the biggest culprits of air leaks result from poorly sealed ducts. I’ve even seen homes where there were ducts detached in the attic, so the furnace was blowing lots of warm, moist air right out of the house! Problems like this cause the snowmelt seen in my earlier posting.

Keep in mind that air leaking out of your house means an equal amount of cold, outside air is leaking in, and that air has to be heated. So if you seal your ducts and other air leaks, you’ll be reducing your utility bills and making your home more comfortable.

How much of a difference can this make? Easily 30% of your heating bill comes from having to heat cold air that comes in through all these cracks! In fact, studies have shown that air sealing your home can provide the best bang for your buck – making your home more comfortable and energy efficient.

So next time you’re wondering why it’s so dry in your house, go looking for the air leaks. Fix those and you’ll have a more comfortable and energy efficient home!